How to Flip Your Classroom – and Get Your Students to Do the Work

 backflip-1

Recently I shared lunch with colleague and friend, Mike Gwaltney. He teaches in a variety of blending settings both in class and online. We got into an interesting discussion about ways to deliver instructional content and learning process both in and outside the classroom. The conversation quickly turned to the notion of “flipping the classroom.” This is the idea that teachers shoot videos of their lessons, then make them available online for students to view at home. Class time is then devoted to problem solving – with the teacher acting as a guide to teams of students. It’s a great approach that flips the delivery of the lesson to homework – it’s like a TiVo time shift that can reshape your classroom. More about flipping here.

Watch this video to see flipping in action – cool graphics courtesy of Camtasia Studio.

Both of us admired teachers (like these in the video) with the time, technology and talent to do video productions – but questioned how many teachers would be able to morph into video producers. Moreover, with the growing catalogue of free online content – we questioned why a teacher would even want to bother to produce their own online material. As Mike quipped – “why would someone video their own Lincoln lecture – when you can watch Gary Wills online?”

Flip the delivery of the lesson to homework – it’s like a TiVo time shift that can reshape your classroom.

Ultimately, we saw flipping the class as a great opportunity to engage our students in taking more responsibility for their learning. Why not let your students curate the video lessons from existing content on the web? As a follow up to our chat, here’s my seven-step how to:

1. Start slow! Pick a single upcoming lesson or unit that you already plan to teach.

2. Recruit a few of your savviest students to do the research to find existing online video material to support the lesson. They should include a text overview defining what the students should be looking for in the video.

3. Also work with the student team to develop an in-class activity that students will do after viewing the video.

4. Post the video lesson to your content manager. Don’t have one? Just use a free Google website – very easy to embed or link to videos there.

5. Then run the video as a pilot lesson for the whole class. Part of their assignment is to decide what they like (and don’t like) about the each component of the lesson. In other words, they assist in the design of rubrics for selection of videos and integration of the video lessons into a classroom activities.

6. Then repeat step 1-3 until you get a good basis for selection of future videos.

7. Repeat 1-6, as needed, until your students have curated a collection of online content to support your classroom. They would also be responsible for better defining what constitutes “high-quality” online content and how that can be best used to support a more student-centered classroom.

Extension: You might even consider adding some pre-assessment for upcoming units – using a formative pre-test or student self-assessment rubric to let students decide which elements of an upcoming unit need video support. Then based on the formative assessment – assign teams of students to curate online content while you work with them in class to design future follow up class activities. If this process works, think of all the class time you would free up. No concerns of running out of time to “cover” the required material. Instead of class time being filled with the pointless transfer of information from teacher to student, you and your students would have the time to apply and explore the content in a more engaging and project-based classroom. Who knows you might gain so much time that you’ll have the chance to discover your inner Scorsese – and go on to produce your own instructional videos?

Image credit: flickr/Nasser Nouri

Prisoner’s Dilemma – A Game Theory Simulation

Back in the 1970’s I taught a high school social studies course called “War and Peace Studies.”

A recent email exchange reminded me of a simplified version of the Prisoner’s Dilemma that I created for use in the classroom.

The Prisoner’s Dilemma is a fundamental exercise in game theory and serves as a great catalyst for discussions about decision making, communications, ethics and responsibility.

First, the classic example of the Prisoner’s Dilemma from Wikipedia:

Two suspects are arrested by the police. The police have insufficient evidence for a conviction, and, having separated the prisoners, visit each of them to offer the same deal. If one testifies for the prosecution against the other (defects) and the other remains silent (cooperates), the defector goes free and the silent accomplice receives the full 10-year sentence. If both remain silent, both prisoners are sentenced to only six months in jail for a minor charge. If each betrays the other, each receives a five-year sentence. Each prisoner must choose to betray the other or to remain silent. Each one is assured that the other would not know about the betrayal before the end of the investigation. How should the prisoners act?  

How I adapted for classroom use

Students were divided into two separate locations. (Group A and Group B). Once divided, I managed the game – shuttling between the two rooms. Both groups were given the same goal – “To accumulate as many points as possible without helping or hindering the other group.” In practice, I found that the point incentive generally faded away as groups just focused on their perception of “winning.”

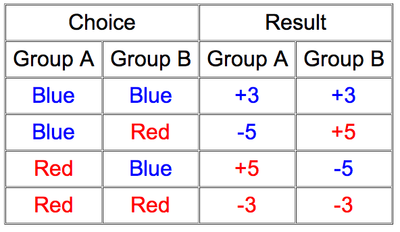
I ran a series of 10 decision rounds. During each 5 minute round both groups were told make a group decision about the choice one of two colors – red or blue. See results chart below. I did not specify how they were to arrive at the decision within their groups. When each group has completed their decision, I shared results back to each group. As the decision rounds accumulated,  players faced the results of cooperation and betrayal.

To add another dimension to the dilemma, periodically (after decision rounds 3 and 6) I invited each group to send a negotiator to a neutral location (usually just the hallway). This was the only communication allowed between the groups. Generally each group was divided over both the instruction to give their negotiator (“bluff ’em” vs “make a deal”) and how to interpret the negotiator’s “report.” Sometimes groups even became mistrustful of their own negotiator.

It usually took about 45-50 minutes to set the game up and go through a series of 7-10 rounds with some negotiation breaks. The homework assignment was to write a reflection “What did I learn about myself during the game?” Loads of great discussion the next day with many great applications to history, current events, group process and ethics.

For great prompts to foster student reflection, see my post “The Reflective Student: The Taxonomy of Reflection.

Prisoners-results

Feature image by Spencer Tamichi on Unsplash

Putting the Problem First Can Create the Knowledge

Dan-meyer-math As I blogged in my Apollo 13 video post,  Watch Problem Based Learning in Action  ”While our students have been conditioned to ‘learn the basics – then solve the problem,’ that’s not how life always works.” 

Here’s a great 4-minute video by Dan Meyer that gives three examples of how to bring real-life problem scenarios into the math classroom.  To paraphrase Dan, “In these examples student have to first ask the question – what information do I need to solve this problem? The textbook usually gives you that information. But here students build the problem and decide what matters. The question that’s usually buried at the bottom – it’s the last thing in the textbook problem – now becomes the first thing in the student’s mind. I want to make that question “irresistible” to the student, so they have to know the answer.”  For more great ideas on how “math makes sense of the world” – go to Dan’s blog dy/dan

3 Ways to Use Social Media to Crowdsource and Blog a Conference Backchannel

conference backchannel

One of the goals of my blog is to research, curate and effectively share information with my audience. Conferences are a great aggregator of expertise and information that have inspired some of my most popular blog posts. Here’s three strategies that I’ve used to crowdsource my research and harness the conference backchannel. All three tools employ hashtags – the popular practice where conference attendees include a common tag in their tweets. Typically conference organizers will designate an official hashtag – some combination of letters / numbers prefixed with a hash symbol “#.”

Use Twitter Visualizers

Wiffiti There are many great Twitter visualizers that can be set up to automatically gather specific Twitter #hashtags. Two of my favorites are Wiffiti and Twitter StreamGraphs. Wiffiti displays entire tweets, while StreamGraphs graphs frequency of keywords within the tweets. Both are interesting visualizations of the conference backchannel. Each tool is free and can be embedded on your blog. And neither requires you to attend the conference. 

Here’s how I used these visualizers  to cover the 2010 ASCD conference. 

Streamgraph For some fun, I used StreamGraphs to blog “comparative coverage” of two conferences that were in session at the same time in this post, “Humanities Conference Smackdown! AHA vs MLA Twitter Visualizers.”


Use Prezi

Itsc11-prezi Prezi is a presentation tool that adds a dimension of space and scale to information. It can be displayed both as a stand alone presentation and embedded on a blog. Here’s how I used Prezi at the ITSC 2011 conference in Portland Ore, where I had been invited to attend as a guest blogger. My onsite tools included my MacBook, iPhone and Flip Video.

During the conference I attended sessions to gather photos / video and tweeted my observations along the way. I also gathered content from other attendees by following the conference hashtag #ITSC11. The finished Prezis can include – tweets, images, video, YouTube video, PDF’s, screenshots, text, hyperlinks and clipart.

Periodically I gathered all the content and created a Prezi. (BTW – I used the same Prezi technique to blog the San Antonio ASCD in 2010.)  


Use Storify

Storify Storify is a new platform that allows users to quickly tell a story using material from the social web. Recently I received an invitation to try out their beta and I’ve been putting it to use as conference blogging tool. 

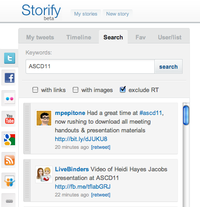
The Storify web-based interface divides your screen in two columns. On the left (screenshot – to the left) are a variety of social media feeds – Twitter, FaceBook, Flickr, YouTube, RSS feeds, Google searches, SlideShare as well as any URL you select. It also has built in search tools that allow you explore your sources using hashtags. My favorite feature is that the Twitter search allows you to exclude RTs. As you find your content,  you drag it to the right side of your screen where you also have options to add text, delete or re-order content. When your Storify finished it can be embedded in your blog. To help you get the word out Storify sends out a Tweet to anyone you have quoted. 

Here’s how I used Storify to cover the recent 2011 ASCD conference in San Francisco. I received many positive comments from viewers who thought I gathered some of the best social media being posted from the conference. I saved them the time of wading through all the RTs, side comments, and promotional tweets. BTW – I did not attend the conference. 

Stay tuned for may ongoing conference coverage – I’m sure there’s a new tool being created that I’ll get to take for a spin!


How to Use Web 2.0 to Teach Literacy Strategies to Struggling Readers

This week I’m heading out to work with intermediate (grade 4-6) teachers on strategies to assist struggling readers.

We’ll focus on three core skill areas central to the Common Core standards – defining, summarizing and comparing using my guide to 18 Strategies for Struggling Readers. (free PDF file)

Plus I’ll introduce some great websites that they can use with the strategies – the new digital literacy meets the old text literacy.

There are two key elements in each skill area that can help students construct meaning and build background knowledge.

Defining

  • Before the formal definition has been introduced, students should be asked to make connections between their prior knowledge and the term.
  • After the term has been defined, students need activities to more deeply process the term. The focus should be on descriptions, not definitions

Summarizing

  • Students should be asked to make their own judgments about what’s important to them (instead of just repeating the details the teacher highlights).
  • Students will be able to more readily summarize, if they are asked to share what they’ve learned with an audience other than the teacher. They need use a text structure to organize their thinking.

Comparing

  • Students should develop the comparison, not simply repeat the model that we present to them.
  • Student should be asked to share what they learned from the comparison. They need use a text structure to organize their thinking.

I’ve selected some Web 2.0 sites that will enable students to use the strategies in a variety online settings. I’ve picked free sites that have easy learning curves.  For example, we will use One Word to negotiate meaning through images, explore summarizing text structures with Five Card Flickr and design comparisons with Wordle and Books nGram Viewer.

Working with words

  1. Explore word frequency with Wordle
  2. Search published works with Google Books Ngram Viewer
  3. Foster writing skills with One Word writing prompts
  4. Expand vocabulary and word choice with TelescopicText 

Working with words and images

  1. Create mindmaps and graphic organizers with Bubbl.us  
  2. Drag and drop words to create poem based on a photo with Pic-Lits
  3. Foster visual thinking and creative writing with Five Card Flickr

Kid-friendly search sites

  1. SweetSites
  2. Ask Kids

For more ways to use Web 2.0 sites in the classroom
download a free PDF at my post
87 Free Web 2.0 Projects For the K-12 Classroom

Image credit flickr/Mike Licht