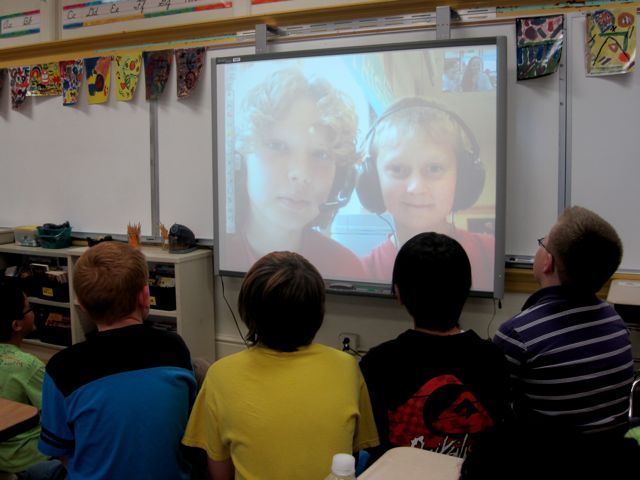
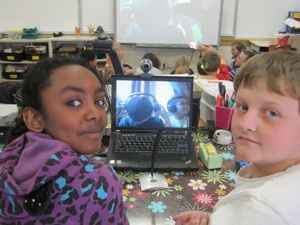
Connecting Classrooms with Skype

skype classroom
skype classroom

I recently blogged from the 2011 US Innovative Education Forum (IEF) sponsored by Microsoft Partners in Learning. Here’s a guest post from, Betsy Weigle, one of the IEF finalists I met at the competition. For more on the competition and other guest posts click the IEF tag. ~ Peter

Betsy Weigle, Adams Elementary School (Spokane, WA)
Project: Connecting Classrooms with Skype and PowerPoint
The objective of this project was to open the classroom to the world by bringing children from Washington state and North Carolina together virtually to share insights on Native American cultures. Students used presentation and interactive conferencing technology, which allowed in-depth, real-time interaction on shared content. Students prepared short PowerPoint slide shows or posters, verbal presentations and question/answer sessions.

Betsy writes:

Nearly every fourth grader in the country studies state history. Students usually read textbooks, do research projects and perhaps create posters or brochures about their state. That’s good. But it can be better. Understanding a state’s culture is so much richer if a student’s place in the world is compared to somewhere different. Here’s how to open your classroom to the world using Skype.

Find a Partner

Although you can Skype with your teaching partner across the hall, the greatest effect comes from out-of-state partners. I found my partner, John Paul Sellars from South Carolina when I attended the Mickelson Exxon Mobil Teaching Academy for Science and Math. A brief visit to a teaching forum (there are hundreds) will reveal many teachers eager to participate.

Narrow the Subject

The result: 100% of students in both classrooms showed they understood that environment was the driving factor in creating the differences between tribes.

“State history” is far too broad. We chose “Native American culture” because both regions had tribal structures and traditions to study.

Assign the Research

Our students determined what they wanted to know about tribal culture. Topics included food, shelter and clothing. They formed small groups for research and used texts and websites to create presentations.

Prepare Presentations

Skype is visual. I focused my students on finding unique ways to communicate their findings. They rose to the challenge, creating colorful posters, PowerPoints for screen sharing, life-sized cutouts of salmon, and even a 30-foot construction paper canoe.

Practice

But, as one student wisely pointed out, “Environment’s not to blame if you can’t get a wife due to bad flute playing.”

Live, on-camera rehearsals help kids do their best, both as presenters and as engaged, questioning audience members. Classroom Skyping also helps work the bugs out of your system. Don’t forget to hold at least one technical check with your Skyping partner to be sure there will be no show-stoppers on the day of the event.

Plan your Assessment

Both classrooms planned a common assessment: Students were required to fill in a Venn diagram on the similarities and differences between the tribal groups.

Present and Learn

With thorough preparation, your students will be fully engaged and ready to not only be great presenters, but involved audience members. We had great questions and answers on similarities and differences between cultures. The favorite difference was finding a wife: In the Northwest arranged marriages were the standard; in the Southeast, a man played a flute outside his intended’s home.

skype classroom 2
skype classroom 2

Push for Higher-Level Thinking

As I outline on my website, I’m a huge fan of forcing young brains to work harder. At the end of the presentation, my partner teacher and I sprung the bigger question on the students:

“Why were the tribes different?”

The result: 100% of students in both classrooms showed they understood that environment was the driving factor in creating the differences between tribes of the Northwest and tribes of the Southeast.

But, as one student wisely pointed out, “Environment’s not to blame if you can’t get a wife due to bad flute playing.”

Learn More

For more information, including videos and a free comprehensive Skyping checklist, visit connecting classrooms with Skype.

This topic was presented at the 2011 Microsoft Innovative Educators Forum National Competition. For a quick video of Betsy’s presentation kiosk, see her August 2011 newsletter.

About the Author

Betsy Weigle is a National Board Certified Teacher with 13+ years of elementary school experience. She is a respected math, social studies and science curriculum developer and creator of a Classroom-Teacher-Resources.com, a detailed website for new elementary school teachers.

Image credit: Betsy Weigle

Digital Storytelling in the Spanish Language Classroom

I recently blogged from the 2011 US Innovative Education Forum (IEF) sponsored by Microsoft Partners in Learning. Here’s a guest post from one of the IEF finalists I met at the competition. For more on the competition and other guest posts click the IEF tag. ~ Peter

Independence HS Grad

Teacher: Matthew Kelly, Independence High School (Charlotte, NC) Matt’s project site 
Project Title: “Espero [I hope]: presentational communication in Spanish through digital storytelling” 
Overview: Advanced and intermediate students of Spanish explore digital storytelling as a medium for self- expression using the Spanish version of Microsoft Photo Story 3 and Microsoft Movie Maker. The assignment required  students to speak, listen, read and write in the target language and introduced concepts of media literacy based on autobiographical narrative.


 Matt writes: 

“My mates and I witnessed an immense growth in vocabulary since we began speaking in Spanish dialect. I consider myself bilingual today.” ~ Zillah (Gambia/UK), grade 12

Grammar in a meaningful context Deep down this project was born as a grammar exercise. The project arose out of a curriculum meeting I had with my students to plan the direction we’d take over the next few weeks. They said, “We need to work on the conditional tense, the future tense, and the subjunctive mood, but we don’t want any worksheets and we’re not going to fill out verb charts.” The idea was to give students meaningful work that would naturally lead them to use the target grammar. All writing, discussion, and presentation was done in Spanish.

The Personal Essay: Our Hopes for the Future

We started with the students writing an autobiographical essay describing themselves and where they are in their lives right now, then going on to talk about their hopes and aspirations for the future. Students then recorded these essays as a digital audio presentation.

Fears for the Future: Exploring Technique Through a Science Fiction Film

Photo Story 3 makes movies by stringing together still photographs with music or narration. I wanted the students to make careful, deliberate choices about what images to use and how to sequence them along with the audio in order to create a coherent narrative. To see an example of successful filmmaking using still photographs, students viewed Chris Marker’s 1962 film La Jetée in French with Spanish subtitles. Native speakers of Spanish were surprised at how much of the French they could actually understand. Students identified the images and sequences that were the most memorable for them and discussed what made them effective.

You be the Director: Bringing Hopes and Dreams to Life

Having practiced with Photo Story 3 and having explored the technique of telling a story through still photos, students used Photo Story 3 to turn their digital audio presentations into digital video. Using their own photos and appropriately licensed images, students brought their essays about their hopes for the future to life in digital video.

The Oral History Project: Sharing Hopes and Aspirations for the Future

To give students a basis for cross cultural comparison and to encourage growth in the domain of interpersonal communication, students interviewed pairs of native and heritage speakers of Spanish their own age about their hopes and aspirations and recorded these interviews as digital audio recordings.

Tips for Implementation

Most students suddenly become perfectionists when recording digital presentations. Allow native speakers in the group to serve as coaches, listening to and critiquing their classmates’ recordings. This will provide opportunity for growth through non-threatening feedback.

We used Audacity® for our digital audio recording. Allow students who have used it before to circulate and serve as coaches. With a little practice, most students quickly become adept. Microsoft Photo Story 3 is quite easy to use and appropriate for classroom. Make sure students are aware there is no spell check feature in any language!

Many students have been encouraged by teachers to appropriate images from the Web without regard to license or attribution for use in school projects. This project offers an opportunity to educate students about plagiarism, respect for intellectual property, media literacy, and proper attribution of sources. You may wish to:

  • instruct students to use only their own photos;
  • show students how to search for images licensed for reuse;
  • show students how to use www.bibme.org to simplify the process of proper attribution; or
  • direct students to an online archive of images preapproved for educational reuse with citations provided.


Summary

“My mates and I witnessed an immense growth in vocabulary since we
began speaking in Spanish dialect…I consider myself bilingual today.”
–Zillah (Gambia/UK), grade 12

That’s what one of my students had to say about her experience with this project. For language teachers taking a communication based approach to language learning, this is a project that will really get students talking. The project addresses all the domains and functions of language: speaking, listening, reading, and writing, and both interpersonal and presentational communication.

Project links:

Students Learn to Create a Business – Tech Skills How To

cupcake business
cupcake business -detail from student powerpoint

I recently blogged from the 2011 US Innovative Education Forum (IEF) sponsored by Microsoft Partners in Learning. Here’s a guest post from, Kelly Huddleston, one of the teachers I met at the competition. For more on the competition and guest posts click the IEF tag. ~ Peter

Teacher: Kelly Huddleston, Franklin Road Academy (Nashville, TN)
Project: “Create a Business”
Abstract: Working with a partner, students create a business, beginning with creating a business plan, writing a mission statement and tag line, and then creating business cards and letterhead. Students also complete a series of spreadsheets to track their income and expenses, as well as produce a commercial and design a web site. Finally, students showcase everything to the rest of the class in a Power Point presentation.

Note: This was first posted on Kelly’s blog “To Kick A Pigeon and Other Musings”  For more samples of her students’ work and the rubrics she used click here

Kelly writes:

I saw an ad on Facebook for the Microsoft Innovative Education Forum, a conference hosted by Microsoft at their headquarters in Redmond, Washington, in July. They were seeking educators who could demonstrate how they used Microsoft products in their classes in unique, innovative, and real-world ways.

Microsoft experienced the highest number of applicants ever for this conference, and I was selected for one of the 100 slots. I am also the only educator in the entire state of Tennessee attending this all-expenses paid, two day, whirl-wind conference. I am quite excited and deeply honored.

Several have asked about my submission so I thought I’d detail it here.

For lack of a better name, I simply call this project “Create a Business.” Students in my Tech class, mainly freshman, do this project each semester, and I’ve been doing it for about eight years. It continually evolves and changes, but this is where I’m at now with it.

Basically, students create a business—as much as is feasible in four months and for high school freshmen. They can work with a partner or go solo. There are many things we leave out due to time constraints such as talking about incorporating, licensing fees, legal/liability issues, creating a shopping cart for their website, etc.

My only guidelines for the types of businesses they may pursue are:

  • All products/services must be legal.
  • There cannot be any minimum age requirements. For example, students are allowed to sell alcohol, tobacco products, firearms, permanent tattoos, etc.
  • They may not sell anything that is morally or ethically questionable even it satisfies requirements one and two.


Here’s the steps given to the students:

  1. Create a business plan detailing such things as the business name, products/services sold and their costs, contact information, operational hours, competition, etc. (Microsoft Word)
  2. Write a mission statement and tag line/slogan/motto. (Microsoft Word)
  3. Design a logo (Adobe Photoshop)
  4. Create business cards, letterhead, and other promotional print materials. (Microsoft Publisher)
  5. Create a series of six spreadsheets to track income, consumable inventory, capital expenses, fixed monthly expenses, payroll, and finally a net/profit loss statement for the first year with projections for the second year. (Microsoft Excel)
  6. Produce a :30 second commercial. (Microsoft Moviemaker)
  7. Create a website with a minimum of six pages: home page, about us page, contact us page, and pages to highlight all products/services sold—pictures, prices, descriptions, warranties/guarantees, return/shipping policies, customer testimonials, etc. (Adobe Dreamweaver)
  8. Create a presentation to showcase everything that was done to create this business. (Microsoft PowerPoint)
  9. Present everything to the rest of the class in a 10-15 minute presentation complete with professional business attire and bringing in “samples” of their products.


Implementation Tips

  1. Have a thorough grading rubric to present to students at the start of the project. I find students calculate their own grades as they go. Those who make As usually realize around the halfway point that need do some sort of extra credit to make an A. Those who don’t make the grades they desire cannot tell me they didn’t know something was required.
  2. Checkpoint progress throughout the process. For example, I will give my students one week to create their business cards and other Publisher documents. At the end of the week, I will check them off for a grade to make sure they are done and all basic requirements have been met. I do not grade their spelling, grammar, creativity or things of that nature at this time, although if I notice an error or design flaw, I will make suggestions.
  3. Show students finished examples of each new phase before they begin in. Example, before we start working on the commercial I will show my students dozens of examples of commercials the past group of students have produced. I will point out elements that were well done, creative and/or effective, and I will point out those items that could have been done better or should have done differently. I will show them A examples as well as C examples so they know what to expect going into it.


Outcomes

  • Due to the nature of our school, many of my students will become owners or managers of businesses someday. I’ve actually had students so inspired by this project to start or manage their own businesses while still in high school. I’ve also had students who enjoyed and excelled at the web design part so much, they later went on to make business web sites for friends and family—for pay.
  • Students are highly engaged in this project, often spending additional time outside the classroom working on it—by their choice, not because they have to. They are allowed a tremendous amount of freedom in design and creativity.
  • This project prepares them for their future careers in a very authentic, real-world manner.
  • I have had numerous parents each year comment to me how they wished they had a project like this when they were in school.
  • I’ve had many students and parents thank me for teaching them or their children things they will actually use in the “real world.” There is no greater complement to me.

If you are interested in the details of this project for your own use in your classroom, or if you are interested in Kelly’s perspective on the Innovative Education Forum, please contact Kelly via her blog. For more about Kelly click here.

How To Make the Block Schedule Work

block schedule
block schedule

Transitioning to a longer class (block schedule) is not as simple as combining what was taught in a few shorter lessons plans and throwing in some homework time at the end of class. It requires looking at the key elements of a lesson and re-thinking how they can be leveraged in the context of more instructional time.

  • Content – what knowledge and skills will be studied?
  • Process – what material and procedures will be used?
  • Product – what will student produce to demonstrate their learning?
  • Evaluation – how will the learning be assessed?

Instead of the block becoming an insufferable 80 minutes of having to “entertain” students, it becomes a learning environment filled with more student exploration and reflection on their progress as learners.

I’ve helped many teachers see the block as an opportunity to create a more engaging student-centered classroom by giving students some measure of decision making in these four elements. Instead of the block becoming an insufferable 80 minutes of having to “entertain” students, it becomes a learning environment filled with more student exploration and reflection on their progress as learners.

Of course, you can’t simply “throw students in the deep end” and expect them to take responsibility for all their learning decisions. But with scaffolding and support, students can take increasing responsibility for their reading, writing and critical thinking.

In support of a training project I’m conducting this week, I’ve created a Google web that features handouts, resources, videos and web 2.0 links. It also serves as a model for how Google docs and webs can be used as learning tools in the classroom.

Image credit: flickr/dibytes

How to Tell a Story: Five Rules for Better Writing

Underwood typewriter
Image credit: flickr/Gonzalo Barrientos

Short is better than long.

Simple is good.

Long Latin nouns are the enemy.

Anglo-Saxon active verbs are your best friend.

One thought per sentence.

I’ll keep this post brief. Thanks to William Zinsser for these essentials of good writing. You can read his full article here.