The Digital Literacy Debate: Are We Really Reading on the Web?

A new series examining the debate on 21st century literacy skills is beginning at the New York Times See: Literacy Debate: Online, R U Really Reading? by Motoko Rich, July 27, 2008.

As teenagers’ scores on standardized reading tests have declined or stagnated, some argue that the hours spent prowling the Internet are the enemy of reading — diminishing literacy, wrecking attention spans and destroying a precious common culture that exists only through the reading of books. … But others say the Internet has created a new kind of reading, one that schools and society should not discount. The Web inspires teenagers who might otherwise spend most of their leisure time watching television, to read and write. …Clearly, reading in print and on the Internet are different. On paper, text has a predetermined beginning, middle and end, where readers focus for a sustained period on one author’s vision. On the Internet, readers skate through cyberspace at will and, in effect, compose their own beginnings, middles and ends. More Literacy_Debate_Online,_RU_Really Reading?  120KB pdf

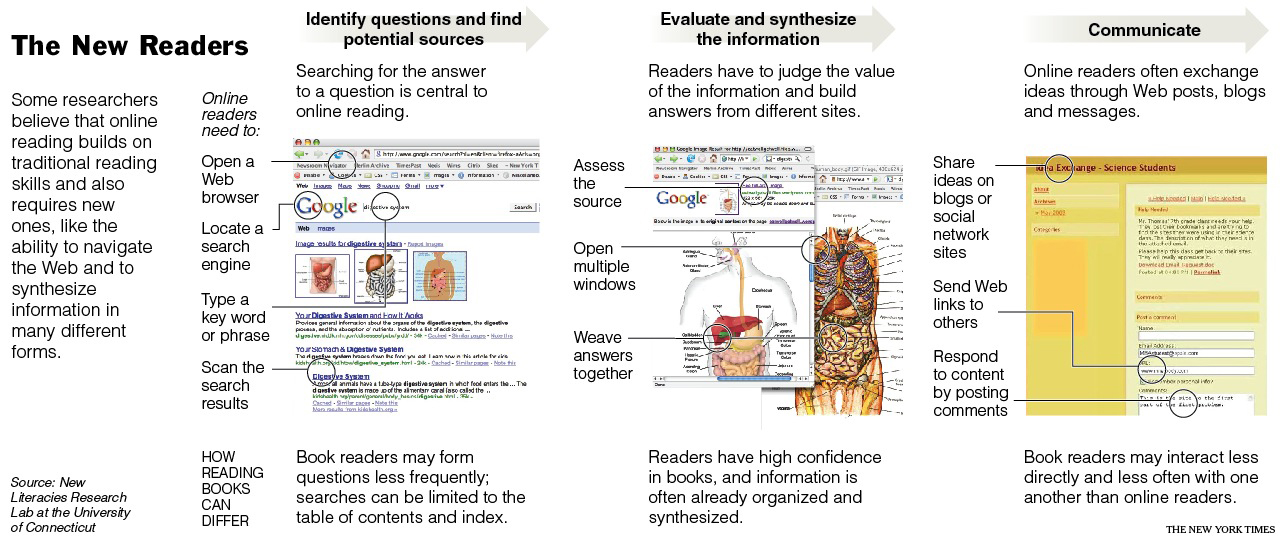
Each medium of communications leads us to codify reality in unique ways. For example, oral communication is very mosaic – we communicate not only with words, but gestures, inflections, and tone. Over time we learn to read all these bits of information and merge them into a cohesive message. Print, in contrast, is very lineal. Writing forces our thinking into some sort of conceptual “meat grinder” that sequences our disparate thoughts together. Following rules of grammar and mechanics, we compose our message into the an equivalent of one long “fortune cookie” of text. The skill set needed to “literate” in speech and print very different as are the relative value we place on effective communicators in each media. A similar case could be made for the unique ways we codify reality in graphic novels, film, video, dance, ASL and so on. Searching and reading on the web is not the same as reading a book.

See the diagram below for distinctions between reading books and online sources (source NY Times). Click image to enlarge

New-readers

The digital literacy debate will continue to rage on, in the meantime educators and parents need to learn more about how the new media are shaping the thinking and perceptions of our children. Students will forge ahead without us. As Carol Jago of the National Council of Teachers of English stated,  “Nobody has taught a single kid to text message. Kids are smart. When they want to do something, schools don’t have to get involved.” 

Note, I last commented on this subject in my post “Is Google Making Us Stupid?” 

Students Can Create Videos to Teach Us “How To”

There’s an emerging genre of internet videos that fall into the category of “how to’s.” Lots of folks are offering up instructional guides for how to do everything imaginable from How to Chill a Coke in 2 Minutes to How to Fold a Towel.

Explaining “how to” requires students to research a subject, evaluate what’s important, and create a guide for someone else to follow. It gives them an opportunity to write for an authentic audience and purpose and use skills that rank very high on Bloom’s taxonomy.

If you want to get your students writing and shooting these videos here’s some suggestions:

1. Get the new Flip Ultra video camera – remarkably easy to use and only $114 at Amazon. Works with Mac or PC. I’ve been using one for a few months and I’m impressed with the sound and image quality and the simplicity of use.

2. Have students take a look at this ingenious “how to” done by Common Craft – no elaborate props or on-screen talent required. The Flip camera won’t be able to shoot as closely as the Common Craft video below, but students can easily recreate the look on a larger scale using the classroom white board and the optional Flip Ultra tripod ($14 at Amazon).

3. Post the video to TeacherTube – a safe alternative to YouTube.

OK – time to make a movie!

Note on editing. The Flip video comes with its own software that works with Mac or PC. Ingeniously, the software resides on the camera and works anytime you plug the Flip USB into a computer.� The Flip video files are created in an AVI format that can be edited on a PC using software like MovieMaker. Mac iMovie won’t accept the Flip video AVI format directly, but you can convert an AVI file to a (iMovie-friendly) m4v file format using free iSquint software. Students can design, shoot and edit the video, then do a voice over. That way they can focus on the visual message separately from the audio message.

8/08 Update: The latest version of Flip video software will allow direct import of files into Mac iMovie!

Teaching Innovation? Inspire Your Students with Maker Faire

Last month’s Maker Faire drew do-it-your-selfers from across the country to San Francisco to show off their creations. While the rest of us seem content to buy what we need, there is a dedicated community of tinkerers out there that is keeping the American tradition of backyard innovation alive. Why not showcase their work to inspire your students to think more creatively?

I’ve made the point that schools need to foster creativity to prepare our students for a future that will put a premium on adaptability. Innovation requires both a strong foundation in content knowledge and the ability to apply that knowledge in new ways – usually across a variety of disciplines. And it requires using all of Bloom’s skills from remembering through creating. Creating is not a skill limited to the gifted. It’s something that all students can do – think of it as a new combination of old elements.

If you’re looking to inspire your students, you might send them online to Maker Faire or it’s parent, Make Magazine (or the like-minded site, Instructables.) Even if you’re too timid to let them haul in old washing machine parts, you can give them the opportunity to do paper designs of their creations in the style of Rube Goldberg.

In the meantime enjoy The Best of Maker Faire 2008

Looking for Copyright-free Historic Images?

The Smithsonian collection of photos has become part of the Flickr Commons group and joins the photo collections of other institutions such as The Library of Congress, the Brooklyn Museum and the Powerhouse Museum. The Commons was launched on January 16 2008, in a pilot project in partnership with The Library of Congress. Both Flickr and the Library were overwhelmed by the positive response to the project!

Plus you can search these images with PicLens, a  free plug-in, which works in Internet Explorer, Firefox, Flock, and Safari. It lets you create a moving wall of images where you'd otherwise just see your Web app's more static display of pictures. Launching the viewer is just a matter of clicking a new "play" icon that appears on images when you're on a PicLens-supported site. 

Piclenswall2_340x170

Using Apple Keynote with TurningPoint Audience Response System

For many years I've used TurningPoint (TP) ARS in my presentations using PC PowerPoint. I'm a convert to Keynote from PowerPoint and I figured out a way to use TP along with Apple Keynote (KN) presentations.  I thought I'd share my work-around with others.

Software and equipment:
I make two presentations – a Keynote talk and a PowerPoint for Mac with TP questions.  Since I usually work with large audiences and move around a lot, I needed a solution that did not force me to stay at my laptop. I run the show on my MacBook using a Keyspan Presentation Pro Remote (PR-Pro3 $79). I have programed the remote to run both shows and serve as an application switcher. I switch between the two programs and the system has worked very well. I now use the graphic power of Keynote and the audience engagement of TurningPoint!

Presentations: Make a KN presentation. Make a PPT question slide show with TP questions.

System PreferencesScreenSnapz002 Laptop settings: Open System preferences / Keyboard and Mouse. Set the mouse tracking to slow. Set secondary button to application switcher. (Note: you will only get these choices is you are using have an Apple wireless mouse and turn it on.


Controls on the Keyspan remote:Prpro3_ext01_r_hi
You will be using three sets of controls. Listed in order starting at the top of the remote.
1. Left and right mouse – Use the left mouse as you normally would – to select. Your MacBook system preferences setting have converted your right mouse to an application switcher.
2. Mouse track button – use to move the mouse
3. Right and left triangles – use to advance either the PPT or Keynote presentation. Also use to navigate between programs when you are in application switcher mode.

Using the remote to make your presentation.
1. Open both the KN and  TP/ PPT presentations in presentation modes. Close all other programs.

2. I'll assume you begin the presentation in KN. Advance the show using the right triangle. When you are ready for your first TP question, press the Keyspan's right mouse. Your open applications will appear as icons over the top of the KN presentation. Use the right / left triangles to navigate to the PPT icon. Press the Keyspan right mouse a second time and PPT will open in presentation mode.

Continue reading “Using Apple Keynote with TurningPoint Audience Response System”