Students Create Augmented Reality History Tour

This guest post is written by Greg Wimmer, Central York (PA) High School. I met Greg at TechitU and was impressed by the projects skillful integration of technology and community involvement into the hIstory classroom. Greg’s guest post follows:

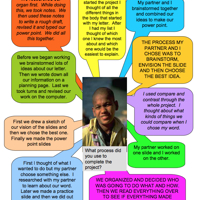
As the Advanced Placement exam season draws to an end in early May, I am always left with a month to explore the intricacies of US History with my students. I usually throw a big project at them to occupy their time and push their thinking in ways that I could not have done during the course. This past spring, however, my ideas were lacking and I was fishing for ideas from other faculty members. After speaking with one of our tech assistants, who is also a board member for the York County Heritage Trust, I reached out to Dan Roe, the educational director for the Trust. My goal was to hopefully devise a project we could complete in May. Through our meeting, I learned that the Trust had desired to push their walking tours in to the 21st Century. We explored several options, but decided that the students could write and produce movies for the Trust’s historic walking tours that could be accessed via – Aurasma – a location-based, augmented-reality smartphone app (or a device provided by the Trust). What happened to Aurasma?

The students were well aware of the project before May, but we unfortunately had no time before then to begin writing the script. In mid-May 2012, Mr. Roe joined my students for two days of collaborative writing. Their scripts focused on two major aspects of York(town) history: 1. York was the political center of the colonies during part of the American Revolution. 2. The Articles of Confederation were completed and signed in York, making it the nation’s first capital. Two groups (of approximately 6 students each) wrote competing scripts for both of the movies. Mr. Roe read the scripts for historical and contextual accuracy and made notes where appropriate. After rewrites were completed, they spent several days writing shot lists and preparing equipment for the shoot. With the exception of a “student on loan” from the TV production class, none of the students had prior experience with equipment or acting.

Students can do amazing things! It’s not until your own students complete a colossal project, that you truly begin to appreciate their capabilities. ~ Greg Wimmer

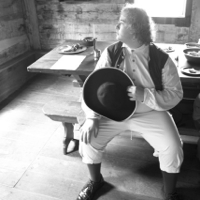
The first day of shooting took place at the Gates House and Golden Plough Tavern, both built in the mid-Eighteenth Century. Lighting and acting jitters proved to be the biggest hurdles, but we amazingly made it through all of the scenes in about 3 hours. While on set, the students were shocked with amount of detail involved with shooting such a short film. Their respect for film and movie-making increased dramatical over the course of the afternoon.

Filming for day 2 required the students to prep and shoot on the spot with random merchants in Central Market York. Two groups fanned out, asked for participation, and held up cue cards during filming. We also had location shoots scheduled for that afternoon, requiring students to set up and tear down several times. By the end of day 2, the students were exhausted and ready to get back to school.

Making Of Video

They spent the next week tying the project together. Two groups edited the videos separately, one group worked with Aurasma, and the other group prepped for the “making of” video. The groups that edited were shocked with the painstaking process of parcelling the movie together. They ran in to one or two continuity issues while piecing together scenes, requiring creative editing on their part. The two girls who worked on Aurasma ironed out the dilemma of image-based vs. location-based markers. They also took the liberty of creating a YouTube channel for the Heritage Trust as well as other accounts necessary to manage the videos and augmented reality program. The final group helped to create the raw footage for the “making of” video. They devised questions, created a set, and interviewed each of the students in class. They also interviewed Mr. Roe and myself for the video. They spent their final class presenting all of their videos, accounts, and reflections to Mr. Roe. He was thoroughly impressed with their final product and invited future classes to create more content for the Trust.

Lessons Learned:

Jump In – While I am very comfortable with iMovie, I knew little about the movie-making process required to complete “professional” videos. The Trust project gave me the opportunity to learn with the students and collectively tap our creativity. Two years ago, my AP students completed an archaeological dig at an early Nineteenth Century home behind our high school. I worked closely with someone from the Anthropology Department of a local university to organize the event. Going in to the project, I had zero knowledge on the processes involved in such a project. But that’s the point. Showing students that you can (gently) throw caution in to the wind and work together to create something unique and original.

Don’t trust technology and expecting the unexpected – When we returned to the high school at the end of the first day, we needed to download our video from the camera card to make room on the disk for day 2. Much to our surprise, NONE of the video files were there. After much jiggling and encouragement (and 45 minutes later), the computer read the files. I have honestly never watched a file transfer so closely in my life. In that situation, I would not have known how to tell students that their hard work was for nothing. Thankfully, things worked out!

Students can do amazing things! – Like many teachers, I spend a good deal of time looking at blog posts and twitter links to projects created by other classes. It is not until your own students complete a colossal project, that you truly begin to understand the their capabilities. At the same time, the students were giddy about their final product and recognized that teamwork in an academic setting makes for positive results.

Greg Wimmer is the Social Studies Department Chair at Central York High School. He’s in his 10th year of teaching – AP US History and Honors Global Studies. He describes himself as “a husband, father, teacher, and collaborator, I commit myself personally and professional to producing creative avenues for growth. Over the past 9 years, I have searched for new ways to build student understanding through collaboration and ingenuity.” Greg can be reached via Twitter@gregwim

Photo credits: Greg Wimmer

How to Motivate Student Writers

My last post, What is Writing For?, concluded by offering three ideas for motivating student writers:

  • Let students make some choices about their writing.
  • Let them write for a more authentic audience than the teacher.
  • Use more peer evaluation and self reflection.

We read everything over to see if it made sense to our audience ~ 6th grader’s reflection

I thought readers deserved an example of these principles in action. Here’s a project I did that exemplifies choice, authentic audience and self-reflection.

I worked with a team of 6th grade teachers to demonstrate the power of comparison skills to help their students build vocabulary and content knowledge about the functions of various organs of the human body. (Based on Robert Marzano’s Building Background Knowledge for Academic Achievement and Classroom Instruction That Works). Additionally we wanted to enhance technology skills and demonstrate the power of student choice and self reflection in a PBL setting.

Students are motivated by writing for an authentic audience. “Publishing” helps students master content and develop project management and teamwork skills. The power of publishing enables students to think like writers, to apply their learning strategies and to organize and express their learning. It exemplifies the best of the information revolution – students as creators of content rather than as passive audience. 

Project overview:

  1. Students were tasked with developing books to teach the organs of the human body to third graders.They decided that the best idea was an ABC book - ”Traveling Through the Human Body with ABCs”
  2. Teams of students chose an organ and had to develop a description of function suitable for 3rd grade audience. Then they were asked to compare the organ to something that functioned in the same way and develop a comparison that 3rd graders would understand.
  3. All the content developed by students went through a peer review process for accuracy and suitability for 3rd grade audience.
  4. PowerPoint was used to layout graphics and text. Update: you might consider design and publication using iBook Author.
  5. Students and teacher were guided through a series of reflective prompts.
  6. The PowerPoints were converted to PDF files and used to publish a few copies of each classes book using Lulu print of demand. 

Teacher reflections included:

  • Students learn best from doing and from doing it together with support but no interference from adults. Students can explain concepts and ideas to each other in “kid-friendly” language more easily, sometimes, than adults can.
  • The lessons are more lasting because they happened in a social context rather than the “top-down” structure of a traditional classroom.
  • Project-based learning creates a student centered classroom with the students doing the real work of real learners. The teachers’ work is primarily off-line.

The book is available in print from Lulu as an iBook at iTunes.

Flipped My Keynote

Tech.it.U is a premier educational technology conference (and Penn State grad course) designed to inspire and generate practical classroom ideas that “will help you teach with power and focus to impact students’ futures.”

“Thank you for making us think. You taught by example.”

I was asked to give the closing keynote on my Taxonomy of Reflection at this year’s, week-long conferenceKeynoters typically show up, explain their model, answer questions, etc. If all goes well, folks leave with an understanding of the ideas you pitched to them.

Transfer of content is easy in the digital age, it’s processing the learning that’s the challenge. So I elected to flip my keynote. Why not use one of the strategies I recommend to teachers? (My slide deck on flipping your class)

To flip my keynote, I gave Tech.it.U participants some advance reading about my taxonomy. Then I used my two hours – not to present, but to put them through a variety of experiences to provoke their reflections. For example, we studied a mid-19th century primitive painting to see how students “feel” when they are asked to construct meaning when they lack background knowledge. LearningCatalytics, a BYOD-based response system, made it possible to harness the power of peer instruction and compare our reflections. 

So how did “flipping” my keynote go? I asked participants to reflect on the experience. Here’s a few of their responses:

  • What a great end to the week. You had me engaged throughout the presentation. The hands on activities with partners, the discussions or arguments with peers, and the videos were perfect. Each of these items had me analyzing, applying, understanding, and evaluating information.
  • Wow! I loved how interactive this keynote was. My brain is on overdrive trying to think of all the amazing things I want to try first. You bring a plethora of fresh ideas and thoughts.
  • I truly appreciate that throughout your presentation you modeled the kind of instruction you proposed we use with our students. That is my favorite way to learn!
  • Very inspiring presentation. Great thoughts on ways to flip the instructional model. … My head is spinning with ways to implement some of these strategies.
  • What an engaging presentation! Learning catalytics is wonderful! I had so many “aha!” moments and it triggered many engaging lesson ideas.
  • I wish more people would champion the idea that students should be responsible for their learning and that teachers should be the facilitators of or catalysts for this to happen.
  • Wow, what a great thought provoking presentation. I love the idea of turning the responsibility of learning over to the students. I am going away with multiple ideas on how I can recreate myself as an educator for my students.
  • Thank you for making us think. … You taught by example.

Reflections on Working with iBook Author

At the core of the creative process is the willingness to step back, reflect on what you’ve accomplished, ask how it’s going and then get back to working on it some more. So after a few weeks of using iBooks Author (IBA), I thought it was time to practice what I preach. I’ll use this post to explore my initial reaction to working with IBA framed with by thoughts on the reflective process. A good warm up for a keynote I’m giving on the reflective process in a few weeks.

Observe
I got my first iPad recently (I skipped versions 1 and 2) and was very excited about using the new iBook Author program to create an iBook. As I took a closer look at IBA, I realized that while it presented some interesting opportunities, IBA had some notable shortcomings. On the plus side, it’s very easy to create an engaging mix of text, images, recordings, and videos. Perfect for my first IBA project – a document-based history iBook. I had already posted lessons on the homefront in World War II and realized there was a wealth of government films, posters and other artifacts that all fell within the public domain. So I got very excited about making an iBook that embodied my approach to empowering the student as historian.

Stay tuned for my finished iBook on Homefront USA. If you’d like to be notified when the book is finished, leave a comment below or send me a tweet @edteck. I’ll be offering a free sample for my beta testers. Here’s a sample of some of the great content that’s available. (1942) Walt Disney made this short film for the US War Production Board

Find patterns
While IBA supports a more interactive reading process – searching text, adding bookmarks, highlighting text, defining words – at the core IBA is designed for traditional instructional methods. For example, iBooks built-in note taking feature is designed to create flashcards (don’t you use flashcards to memorize stuff?). Its built-in test feature can only be used to create an objective questions – not the tools I was looking for to support critical thinking skills. There doesn’t seem to be away to copy and paste text from my books author into some other iPad program. I don’t see ways for students to share their thinking without leaving the iBook.

Videos are very interesting components of iBooks, but here’s the challenge. The more videos you put in the book, the bigger the file size of the book. Not only does iTunes place a 2 gig limit on the size of an iBook, but in practical terms no one wants to fill up their iPod with your book. One option is not embed the videos, and instead, link to them with a YouTube widget. That keeps your iBook’s file size smaller, but it means your reader will need to be online and not in a school network environment that blocks YouTube.

Ask for help
I spent a lot of time on Apple discussion groups reading IBA-related threads, and posting questions of my own. I posting a poll on Twitter to ask educators what they thought about the YouTube link vs embed the video question. Results – nearly 90% of them voted to embed the videos into the book. Reflection can be a social experience. Framing questions and sharing your progress forces you to construct models that capture what you’ve accomplished and better define the tasks that lie ahead. Hat tip to my friend and colleague Mike Gwaltney who took a look at my concept iBook and offered great feedback.

Share what you’re learning
As I found online resources for using IBA, I posted them to a collection I started at Scoop.it. My Publishing with iBooks Author began to attract viewers, many of whom proved to be great resources for me. As I tweeted out my new online resource finds, more leads came in and I found myself connected to a group of educators exploring the same topic. One contact, Luis Perez, made me realize that I wasn’t taking full advantage of the iBook’s accessibility features. He’s also working on ways to compress video size, and still be able to have caption videos for accessibility.

Motivate yourself with design thinking
Open yourself up to the cycle of planning, execution, reflection you might expect to see in an artist’s studio – it’s addictive. I find myself thinking about and working on this iBook all the time. (that’s why you haven’t seen any posts from me in a few weeks) The self-directed project provides all the essential elements of motivation. I chose the content, process, product and was doing my own evaluation. Through it all, I was exploring the frontier of what I knew and what I didn’t know. After all – this is why project-based learning works.
 

The Flipped Classroom: Getting Started

I recently gave a webinar on getting started with the flipped classroom. Lots of good questions – seems like many teachers see the value in using “flipping” to redefine their classrooms. They recognize that the traditional classroom was filled with a lot of lower-order, information transmission that can be off loaded to “homework” via content-rich websites and videos. That frees up more classroom time as a center for student interaction, production and reflection.

While some may think flipping is all about watching videos, it’s really about creating more time for in-class student collaboration, inquiry, and interaction. It’s also is a powerful catalyst for transforming the teacher from content transmitter to instructional designer and changing students from passive consumers of information into active learners taking a more collaborative and self-directed role in their learning.

In this webinar I address the opportunities and challenges, introduce some fundamentals and offer suggestions for getting started in a feasible way. I suspect that before long, flipping will no longer be as a fad, but simply another way point in the transition to learning environments that blend the best of face-to-face and online learning. Here’s some more of my posts tagged flipped classroom.

Download my slide deck for strategies, resources, lessons and links and more.

The Flipped Classroom: Getting Started

View more on Slideshare from Peter Pappas
Image credit flickr/pobre