What Do You See: Visual Thinking Strategies in Action

Visual thinking strategies in action

I’m pleased to be offering a pair of workshops in Eugene Ore this month on how to enhance instruction using visual thinking strategies. (hosts: Oregon Writers Project / STELLAR.)

In the workshops I will guide participants through practical examples of:

  • VTS as a model for inquiry learning
  • Teaching inquiry with documents
  • Blending visual & critical thinking with literacy

Student critical thinking skills can be activated when students are guided in close reading of visual documents. Key questions include:

  1. What does it (image) say?
  2. How does it say it?
  3. What’s it mean to me?

Try it out yourself by comparing these two photographs (How I made this image blend)

I think visual literacy approach has application across the curriculum and grade levels. I’ve included a copy of the presentation handout. What do you see handout 4mb pdf

Here’s some more resources:

  • How I used historical images to guide students through developing summarizing skills. Link
  • Teacher Resource guides from the University of the Arts / Library of Congress Link
  • “Five Card Flickr Stories” A great tool for building and narrating visual stories. Link
  • “Which one does not belong” A growing collection of pattern recognition puzzles Link

How I Turned My Class into an Edcamp

Last week I ran a three-hour intro to edtech class for our incoming cadre of about 40 MAT students. In the past it been done lecture-style, but that’s not my thing. As a founding team member of #edcampPDX, I thought why not an edcamp?

We gathered in a large multi-use room and I opened with a few “get-to know-each-other activities” (this cadre has just started this summer). I gave a 30 min demonstration / lecture on “5 ideas for teaching in the digital age.” See handout on site.

Summer Edtech Camp

Then I turned the group over to this Google site I had created. I split them into 10 teams and assigned them one of the 10 apps with the following instructions:

Click on the link for your app and you will see a demonstration of the app, a short “how-to” video and links to set up your account. Work with your team to figure out the app, create something using it to share back to the group via this Padlet and be prepared to tell the rest of the group what you liked / disliked about the app and how you could use it in the classroom.

They dug in and all were successful at creating content using their app and gave some “spot -on” critiques of the apps. I closed with a Google form “Exit Ticket” and here’s some of their responses to two of the questions:

What’s one thing you learned about edtech today?

  • That using technology as a teacher isn’t as difficult/scary as I thought.
  • Find ways to embrace tech in the classroom rather than ban it.
  • I learned the importance of “being less helpful.”
  • I learned about all these different apps I had never heard about before.
  • I learned about a lot of sites and apps I can apply to education and to also pad my student teaching portfolio.
  • It allows students to create/synthesize content that promotes higher order thinking.
  • That we need to create opportunities to create and not just consume when using technology.
  • There is more technological help out there than I thought.

What’s one thing you learned about yourself today?

  • That I’m still intimidated by technology, but less-so now.
  • It takes me a little longer to be creative.
  • I can do more than I thought I could do with technology.
  • I liked being able to engage with site in an interactive way and just messing around with it to figure out how it works.
  • That I can be more techy.
  • I work well in groups of people with similar ideas.
  • That if I don’t keep up to date, I’m going to be that teacher that does not know how to operate the projector or future equivalent.
  • That I am capable of using technology and do not need to be afraid of it in my classroom. This will help a lot when it comes to working with students who are technology driven.
  • I was scared to use technology in the classroom before but I realized today it is super easy. I can see myself using way more technology now.
  • I should teach myself more of technology.
  • I thought I wouldn’t like using technology in the classroom, mostly because I tend to be technologically challenge, and easily intimidated by it. However, today I learned that I can use lots of these sources. They are not to be feared!
  • I learned that I enjoy working on platforms that allow for multiple people to work on them at once. I found that to be really useful.
  • It takes me longer to figure out technology than my younger peers.
  • I used to think that I needed a tutorial to figure out technology, but I think it is beneficial to just work with the site.

Digital Storytelling with Sway

I’m always on the lookout for tools that make it easy for students to be digital storytellers. I just took Microsoft’s Sway for a test ride and I am impressed. (Sway is part of the Office365 suite and free for students and teachers.)

See student projects made with Sway

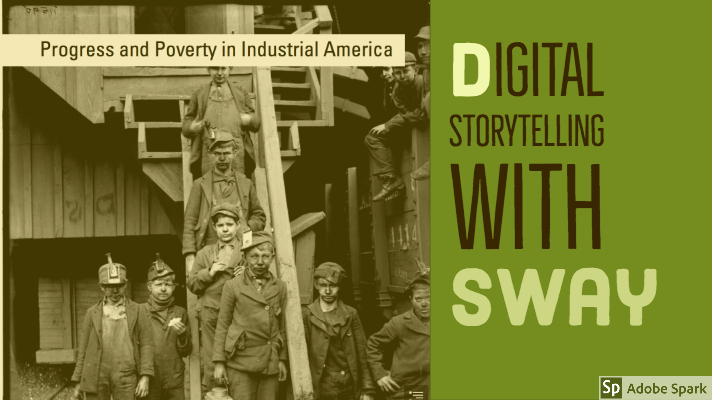
Here’s my first creation – “Progress and Poverty in Industrial America.” Direct link to Project.

I found Sway to be very intuitive and I figured it out without much need to go the Help section. I could easily add images, text and variety of digital content from my drive or other external sources. A built in search tools allows users to limit searches to Creative Commons. Once content is selected, the source citation (with link) is automatically added to your creation – a great feature for students working on their digital hygiene skills. 

There are some styling options that let you explore a few different looks. With some trial and error I eventually got the look and interaction I wanted. Sway has a long list of embed options that add external content to it’s native tools. I’ll be exploring those next. 

Sway has built-in collaboration options so teams of creators can work on the same project. Sharing tools make it easy to promote your work across social media and as you can see here – it’s easy to embed your Sway in WordPress. Designers can set permissions to allow viewers to export, duplicate, copy or print. Or set the project to view only. It even has a built in “Accessibility Checker” analyzes your project and shows where alternative text is needed.

Sway projects are responsive and look great on desktop, tablet or smartphone. Android and iOS apps allow you to design or edit via your smartphone. It provides minimal analytics. But one interesting aspect is it sorts your viewers by “Glanced”, “Quick Read” and “Deep Read.”

Teachers: Find the Courage to Be Less Helpful

I just finished teaching my undergraduate edtech methods class at University of Portland. I had a dozen students  – sophomores through seniors. Most had limited tech backgrounds.

Rather than teaching apps, I taught adaptability. That began with having the courage to be less helpful. At our first class I gave them a simple assignment – create “Tech-Savvy Teacher’s Meme” using Adobe Spark Post and then write a blog post elaborating on your meme in our WordPress site. No one in the class had used either Adobe Spark nor WordPress. No direct instruction from me – I had a created some YouTube video explainers. They had to figure it out themselves. The result – everyone was able to make a cool meme and write their first post on WordPress. They didn’t simply learn a few apps – they learned “I can do this!”

Over the next 14 weeks, we progressed PBL-style through a variety of skills and perspectives. Each class added new tools and perspectives to prior experience – curating public domain content, screencasting, digital storytelling, video production. By the time we got to the end of the course, I had them testing and critiquing apps with no support from me. I would give them three apps designed to perform similar tasks, ask them to work in teams to figure out how to use them, report back to class the pros and cons. And then everyone in the class would choose one app for completing the next assignment – For example – turn a video into a lesson using EdPuzzle, Video Ant, or TEDed.

As a final assignment I asked them to create a demonstration of their favorite app as a chapter in our collaborative iBook – Tech Tips for Teachers. Available free at iTunes or as a static pdf download. (14 mb)

So how did it go – here’s some comments from their final reflections

Laura: I learned that I really need to push myself when it comes to trying new things, because I am capable of much more than I give myself credit for. …  a lot of these new tools intimidated me and I was afraid to try them, but once I did, I found it pretty easy to use.

Margaret: I’ve really enjoyed my time in this class this semester. It was definitely one to look forward to in the week, a break from the typical lecture style of other classes. Something I learned about myself during this class is that despite not liking the amount of freedom given to me, I have found ways to create guidelines for myself. … I think with all the things that I have learned during this short amount of time, and the simple pride I got from figuring out how a piece of tech works on my own – I think I will be able to “keep up with the times” with relative ease.

Kiana: Prior to this class I was, admittedly,  worried and mildly fearful about utilizing technology so frequently in the classroom. I had very limited knowledge and experience with these types of tools and felt that I would be unable to create products worth sharing with the online world. Although my posts this semester may not be TPT (Teacher Pay Teacher) ready, I was pleasantly surprised with how much content I have created in such a short period of time…. I have already begun to share my knowledge of these “tech tools” with family and friends who are also impressed with how many accessible (free), resources there are.

Dylan: Unlike most classes that follow a specific rubric or have step-by-step instructions, this class and Prof. Pappas, gave us an incredible opportunity to explore new technology, but figure out all the tips and tricks on our own. .. one of the most exciting parts of this class were all the ideas I generated when thinking about what tech tools I now have in my toolbox and ones which I can easily use in lesson and unit plans, as well as on a daily basis with my students. I hope to encourage my students to use technology wisely and to most importantly…be creative with it!v

Nick: Our instructor gave us students just enough background information so that we could wrestle with discovering the technology ourselves. ..He pushed us students to learn for ourselves as he gently guided us alongside. I felt this was a perfect approach to teaching this class as I now feel more prepared to be adaptable and curious to continue learning.

Jordyn: There were also times where I would be using a new app and I just had to figure it out through trial and error. Once I had worked through it for a little while I felt very comfortable using it. Being willing to fail is one of the only ways that we truly learn anything in my opinion.

Melissa: Looking back on that first day of ed tech methods, I felt I was afraid to take that risk and get outside of my comfort zone. I  was an advocate for technology, but only ones that were safe,  such as SmartBoards or Elmos which are simply advanced versions of projectors and white boards. … While there were many programs I was nervous to use,  I was also able to learn new tools which I found my new strengths in.

Bri: I never particularly saw myself as a “tech person” and was a little fearful of whether I would be able to navigate my way around all this new technology. … I am proud of the amount of work I have produced in the short amount of time we have had together and I am proud to say I am not so fearful of exploring new technology that comes my way and I could also potentially see myself implementing these technology tools into my own classroom in the future.

Madison: I learned that stretching myself to learn different things is important in order to become more confident. I learned that although technology is a difficult subject for me, it is good for me to learn new things in order to grow as a person. I am definitely on my way to becoming a “tech-savvy” teacher!

Michael: Overall, it is my opinion that this course was a great success. One of the foundations listed on the class’s website states that the course “leverages a project/problem-based approach,” while another one says that it “…develops critical evaluation skills for assessing what works.” These were both met spectacularly: the course ran using an effective weekly project-based approach that promoted individual critical thinking concerning a wide variety of useful – and sometimes not useful – educational technologies for classroom use.

Lauren: I also learned a few things about myself as a learner too. I learned that I about how much fun teaching can be. All these tech tools take a lot of creativity and flexibility and these were both aspects of myself I needed to work on. Using the Apps we learned about caused me to challenge myself as a more hands on student and future teacher.

Hanna: I saw myself doing things with technology that I had never done before and pushing myself to try new things. I learned that technology is a lot more fun to include in every aspect of the classroom when you are comfortable with it!

Did Pages Replace iBooks Author?

Did Pages replace iBooks Author

Quick answer – no.

Here’s more – Apple’s March 27th education event announced that Pages could now create ebooks using a variety of templates for fixed-format and free-flowing ebooks. (See templates below). The updated Pages can be used on Mac desktop, iPad and iPhone to create ebooks that combine text, images galleries, video, audio and sketches.

This week, some blogs announced that the Pages upgrade [from ePub 2 to ePub 3] replaced iBooks Author – iBooks Author is Gone, And it’s Been Folded into Pages.” 

Wrong.  Apple hasn’t dropped iBooks Author (iBA) –  it’s still a free download in the MacOS App Store.  iBA continues to be the best app for designing eBooks that are truly multi-touch.

Pages ePub book templates

Here’s the best features of creating an eBook in Pages

  • Use the familiar iWorks toolbar and format commands
  • Work on both MacOS and iOS (both iPad and iPhone)
  • Support team collaboration on the same file.
  • Use the Apple Pencil (or your finger) to draw right in the app.
  • Produce a ePub3 file that can be viewed most any device / platform except a Kindle – including Macs, iOS, Windows, Android, ChromeOS.
  • Create eBooks that can be offered on Apple iBookstore

Here’s the iBooks Author-only features that Pages can’t match

  • Create eBooks with chapters and sections. (Pages’ ePub 3 book are one continuous document).
  • Include intro media, enhanced table of contents, thumbnail page view, glossary, study cards and note taking.
  • Add interactive iBA widgets – Keynote presentations, pop-overs, scrolling sidebars, 3D, interactive images and review questions.
  • Choose from multiple view / play options for audio and video imports.
  • Use 3rd party HTML 5 widgets (for example from Bookry)
  • Choose from more templates, layouts and page options.
  • Directly upload to iBook Store

Serenity Caldwell tweeted after speaking to Apple: