Kept it Simple: My 2017 ADE Application Video

I just found out I’ve been accepted in the Apple Distinguished Educator Class of 2017. I’m very excited to network with other ADEs and promote my favorite teaching tool – iBooks Author. Once you get past the pre-required Apple Teacher Certification (ugh … I don’t use Garage Band), the ADE application has two main components – lots of forms to fill out (easy) and your application video (hard).

I thought I might share my video production workflow to demonstrate how you can turn a seemingly daunting task into something that’s very simple.

  • I brainstormed a list of 3- 5 accomplishments that demonstrate why I should be consider for admission to ADE.
  • I put each item on a Keynote slide.
  • I used the Keynote “Play/record” slideshow feature to give a brief narration over the slides. (Your video can only be a maximum of 2 minutes, so this gives you a good idea of what leave out). In ended up with 9 slides in my final version.
  • Once I had a sense of timing. I worked on images to illustrate each point. I used QuickTime player to create two short video clips which I embedded in one of the slides.
  • I used very minimal style – solid black background and no transitions between slides.
  • I practiced a few times to get the slide timing down and to be sure I could deliver the slides in under 2 minutes.
  • I found a quiet spot and connected a decent external microphone to my laptop. Then I made a finished recording of the slide show. (All you can do is erase a recorded slide show and do it over. So when I got one I liked, I kept it.) It wasn’t perfect. I had a few minor hesitations, but after 4 or 5 tries I wasn’t getting much better.
  • Keynote has an export feature  – “File / Export to / Quicktime.”  I chose the “Custom” format and used 1024 x 768 H.264
  • It produced a very nice m4v video file that I used for my ADE application.

Tell Then and Now Image Stories with JuxtaposeJS

Created with two archival photographs
Tom Torlino – a student at Carlisle Indian School, 1882 and 1885.
More about Tom at my post on Medium.
Pro tip: get the eyes aligned

I’m excited about JuxtaposeJS – a new free web-based “storytelling” tool from the Knight Lab at Northwestern University. As they describe it: “JuxtaposeJS helps storytellers compare two pieces of similar media, including photos, and GIFs. It’s ideal for highlighting then/now stories that explain slow changes over time (growth of a city skyline, regrowth of a forest, etc.) or before/after stories that show the impact of single dramatic events (natural disasters, protests, wars, etc.).”

I think it’s a great tool for students and teachers who want to explore themes of continuity and change. While it could be used to compare and contrast in subjects across the curriculum, I’ve created a few examples using historical content.

I selected pairs of historical and contemporary images with elements that are consistent and aspects that change. But the challenge is to size and crop the images so that the consistencies align. To accomplish that, I used another free tool – Google Slides – to position and crop each pair of images and export as JPGs before importing into JuxtaposeJS. (Scroll to the bottom of this post for my workflow video that illustrates each step of the process.)

 
Timeline slider

Created with archival photograph paired with a screenshot I took from Google Street View.
Portland Ore Engine No 2 – 510 NW 3rd Ave.
Pro tip: choose a historic image that is shot from an angle similar to Street View. Street View is made up of a series of still images. You may need to navigate slightly on the street to get a shot that matches. Street View has been shooting for years. Use the drop down timeline (highlighted here) in upper left of Street View that has the angle and lighting that works best for your Juxtapose

Archival photograph of paired with photograph I took in the same location.
Taylor Hotel entrance Circa 1920
Pro tip: bring along a print out of historic photo to line up you new shot. Maybe you’ll get lucky (like I did) and find a SUV parked in the right spot. 

Here’s a video that details my workflow for this project
You’ll see how I used the transparency feature in Google Slides to create two well-aligned images that I imported into JuxtaposeJS via Dropbox. JuxtaposeJS supports both vertical and horizontal sliders. Pick the orientation that does a better job of concealing or revealing the continuity and change. Once the images are “published” at JuxtaposeJS they can be imported into your web via an iFrame embed as I have done in this post.

Image credits:
Tom Torlino
Portland Ore Engine No 2
Taylor Hotel Entrance. 347 SW 3rd Ave Portland Oregon Courtesy of Oregon Nikkei Legacy Center ONLC 533

Where I’m From: Using Haiku Deck to Visualize Place

Where-Im-fromHere’s a lesson I designed for use in my University of Alaska Southeast summer course – ALST 600. I’ll be working with nearly 40 preservice teachers in the secondary MAT program teaching Alaska Studies using a place-based approach that integrates good instructional practice and free ed tech tools across the curriculum. For more on this lesson click here

This lesson features a poem as a prompt for a creative reflection. It also integrates two tools for presentation of the reflection.

  1. After reading Where I’m From, students will use Haiku Deck to design a brief presentation that uses text and images to depict “where they are from.” The presentation should include a a title slide plus 6 slides which explore the place you’re from. Follow this link for ideas on Where to Go with “Where I’m From”
  2. After completing the Haiku Deck presentation, students will create a blog post that includes an embedded version of the presentation and a written response to the question:

What have I learned from this activity and how might I use the learning strategies and / or technology in my teaching placement?

Where I’m From” by George Ella Lyon

I am from clothespins,
from Clorox and carbon-tetrachloride.
I am from the dirt under the back porch.
(Black, glistening,
it tasted like beets.)
I am from the forsythia bush
the Dutch elm
whose long-gone limbs I remember
as if they were my own.

I’m from fudge and eyeglasses,
from Imogene and Alafair.
I’m from the know-it-alls
and the pass-it-ons,
from Perk up! and Pipe down!
I’m from He restoreth my soul
with a cottonball lamb
and ten verses I can say myself.

I’m from Artemus and Billie’s Branch,
fried corn and strong coffee.
From the finger my grandfather lost
to the auger,
the eye my father shut to keep his sight.

Under my bed was a dress box
spilling old pictures,
a sift of lost faces
to drift beneath my dreams.
I am from those moments–
snapped before I budded —
leaf-fall from the family tree.


How to Embed Literacy Skills in Historical Thinking

The_Magdalen_Reading_-_Rogier_van_der_WeydenSoon I’ll be giving workshops demonstrating how to integrate literacy skills for close reading with historical thinking skills. Here’s a preview.

What do we mean by historical thinking?  It’s the historian’s version of critical thinking:

  • Examine and analyze primary sources – who created it, when, for what purpose?
  • Understand historical context. Compare multiple accounts and perspectives.
  • Take a position and defend it with evidence.

What do we mean by close reading? Teachers can guide students with scaffolding questions that explore “texts” (in all their forms).

  • Key Ideas and Details:
 What does the text say? Identify the key ideas. What claims does the author make? What evidence does the author use to support those claims?
  • Craft and Structure:
 Who created the document? What’s their point of view / purpose? How did the text say it? How does it reflect its historic time period?
  • Integration of Knowledge and ideas: 
Distinguish among fact, opinion, and reasoned judgment in a text. Recognize disparities between multiple accounts. Compare text to other media / genres. How does it connect to what we’re learning? 
And what’s it mean to me?

Let’s look at how a close reading of historical sources for craft and structure can integrate with the historical skill of sourcing  – who created it, when, for what purpose?

Here’s a great illustration of historical sourcing from Stanford History Education Group’s Beyond the Bubble.

And here’s an exercise I used with teachers at a workshop this past summer. Here’s the instructions they were given:

  1. Create and post a source comparison. Be sure to include: Historical question and two sample sources.
  2. Once other workshop members have posted their source comparison questions, use their content to answer the question: “Which do you trust more? Why?”
  3. Feel free to add multiple answers to the same question and / or comment on each others question / or answer. It’s a dialogue.

Here’s a Google doc with my prompts and teacher responses.

Image Source: Rogier van der Weyden, Detail from The Magdalen Reading, c. 1435–1438. National Gallery, London

PD Should Model What You Want To See in the Classroom

It’s August and that’s back to school time. All across America teachers are sitting is staff development workshops. Some sessions are valuable, others will leave teachers wishing they could be setting up their classrooms.

Recently I had the chance to work with Marta Turner / NWRESD to design and administer a staff development grant from the Library of Congress and the TPS Western Region. The goal of the project was to give participating teachers skills in designing historical thinking skills lessons utilizing primary source documents from the Library of Congress’ vast online collection.

I saw it as a chance to demonstrate my first law of staff development
PD should model what you want to see in the classroom. 

So in addition to mastering historical thinking skills utilizing LOC.gov, this workshop became a demonstration of the following:

How to flip your class:
Orientation to the LOC site was something better done on participants’ own time than in whole group. We utilized Versal (a free and stylish LMS) to offload that task to a flipped pre-course. Teachers arrived at the workshop with a working knowledge of LOC online resources , strategies for teaching historical thinking skills and ideas (and LOC documents) for their demonstration lesson.

Thanks for shepherding us through the process – a motivating demonstration of what’s possible with kids ~ Paul Monheimer, participant

Leveraging tech tools for design and collaboration:
Teachers collaborated in the pre-course using Google docs to design and curate examples of historical sourcing. I created YouTube tutorials to use throughout the pre-course and workshop session to blend the learning.

Teachers collected historical documents from the LOC into shared Google slides. This facilitated easy peer review and also served as an archive for materials in preparation for transfer to iBooks Author.

We used Google Hangouts to explore “how historians think” with Dr. Adam Franklin-Lyons – associate professor of history at Marlboro College.

Motivate with project-based learning:
Teachers were pleased that the workshop would produce lessons they could use. But right from the start they knew that they were not simply getting together to learn some strategies and create some lessons. They had an iBook to create and we only had two days onsite to do so. As educators, we talk about value of the authentic audience for our students but it applies to our teacher PD as well. (I held myself accountable to the same standard, since the major elements of the workshop were shared on my blog and via the Versal pre-course.)

Our participant teachers left the 2-day workshop energized knowing that their work was documented for our grant funders to replicate in other projects and proud that their lessons would be available as an iBook on iTunes in 51 countries around the world. Note: Time did not allow me to teach iBooks Author to the teachers, so I designed and edited the iBook later. For more on how I teach iBooks Author, see this iBA workflow post.

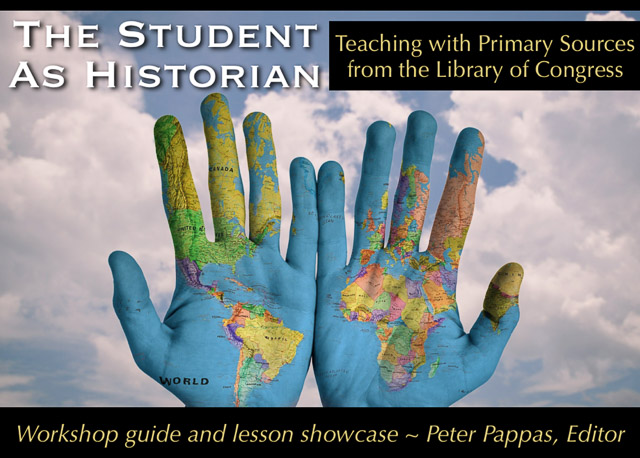
We are proud to share our iBook The Student As Historian ~ Teaching with Primary Sources from the Library of Congress. This ebook contains both the training materials and fourteen teacher-designed document-based questions for grades 4 through high school.

The lessons draw from a fascinating collection of text and multimedia content – documents, posters, photographs, audio, video, letter and other ephemera. “Stop-and-think” prompts based on CCSS skills guide students through analysis of the primary sources. Essential questions foster critical thinking. All documents include links back to the original source material so readers can remix the content into their own curated collections.

Download free at iTunes here. It’s viewable on Mac, iPad and iPhone 5 or newer. If those options don’t work for you, you can download it as a PDF The Student as Historian-PDF version 14 MB.  (Interactive widgets will not function in pdf version)

Note: This is not an official publication of the Library of Congress and does not represent official Library of Congress communications.

Image credit: stokpic / Pixabay
Creative Commons CC0 Source