How To Teach EdTech to Future Teachers

I’ve been asked to pilot a new edtech class this spring for undergraduate ed majors in University of Portland’s School of Education. I’m still in the brainstorm phase and I thought I’d like to share some of my initial thinking.

First off  – a few things that I don’t want to do:

  • Oversell edtech. Too often educators try to force the latest edtech tool into the classroom because they think it’s cooler. Faster. Shinier.
  • Focus on teaching apps. Oh how I hated being forced to sit in a computer lab and suffer though PowerPoint professional development as a teacher. When I need students to use a specific app, I typically create a YouTube channel of short screencast how-tos. Or students can use the University’s Lynda account for more.
  • Take sides in the platform / device religious wars. These students will end up teaching in different settings, each with it’s own unique edtech landscape. They’ll need to be able to use what ever they find in their placements.

Instead I’d like to first “teach” adaptability – the mindset that’s helped me navigate the ever-changing edtech environment since I began my career in the early ’70s – an era of filmstrip projectors, 16mm movies and ditto machines. I’ve always thought first about my instructional goals, then tried to leverage whatever resources I could find to reach them. That calls for flexibility and a willingness to figure things out on your own. I couldn’t wait around for some school-sponsored PD.

A second, equally important goal would be to teach critical evaluation of the intersection of good instruction and technologies. A good teacher is skeptical, always re-assessing what’s working and what’s not. That’s especially important in the dynamic edtech world.

I envision a problem-based approach where I layout a series instructional challenges (opportunities?) and invite student teams to come back with a plan for achieving the goal using as much or as little technology as they saw fit. They would be expected to find a way to share their work in or out of class (why not flip that as well?) We would then go though a group evaluation, reflecting on what worked and what didn’t. Was the juice worth the squeeze? Move on to the next instuctional challenge. Reflect, rinse, repeat.

Here’s how I thought I might open my first class:  “Good instructional often begins with a pre-assessment. This is an edtech class, so as a starting point we need to get sense of where everyone resides on edtech landscape.”

  • What would be useful to know?
  • How should we gather that info?
  • How do we store and share (represent) what we find out?
  • Would any digital technologies be useful in this task? If so, which ones?
  • How do we set that up so that your peers can be successful participants?

Brainstorm over: Any thoughts on this approach? Anyone else out there teaching an edtech course and care to share?

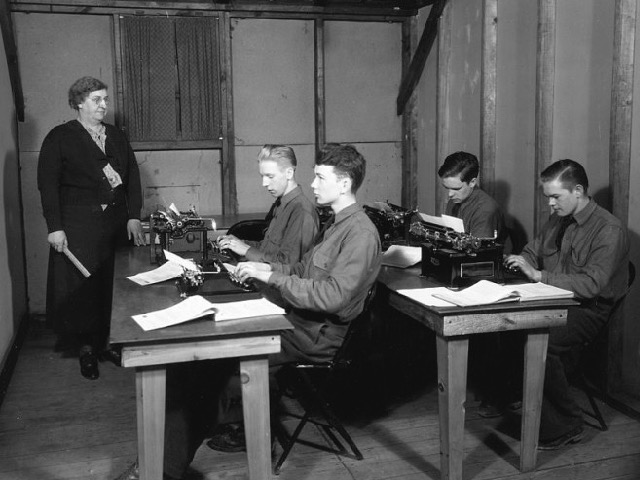
Image Credit: Civilian Conservation Corps, Third Corps Area, typing class with W.P.A. instructor ca. 1933
National Archives and Records Administration Identifier: 197144

Tell Then and Now Image Stories with JuxtaposeJS

Created with two archival photographs
Tom Torlino – a student at Carlisle Indian School, 1882 and 1885.
More about Tom at my post on Medium.
Pro tip: get the eyes aligned

I’m excited about JuxtaposeJS – a new free web-based “storytelling” tool from the Knight Lab at Northwestern University. As they describe it: “JuxtaposeJS helps storytellers compare two pieces of similar media, including photos, and GIFs. It’s ideal for highlighting then/now stories that explain slow changes over time (growth of a city skyline, regrowth of a forest, etc.) or before/after stories that show the impact of single dramatic events (natural disasters, protests, wars, etc.).”

I think it’s a great tool for students and teachers who want to explore themes of continuity and change. While it could be used to compare and contrast in subjects across the curriculum, I’ve created a few examples using historical content.

I selected pairs of historical and contemporary images with elements that are consistent and aspects that change. But the challenge is to size and crop the images so that the consistencies align. To accomplish that, I used another free tool – Google Slides – to position and crop each pair of images and export as JPGs before importing into JuxtaposeJS. (Scroll to the bottom of this post for my workflow video that illustrates each step of the process.)

 
Timeline slider

Created with archival photograph paired with a screenshot I took from Google Street View.
Portland Ore Engine No 2 – 510 NW 3rd Ave.
Pro tip: choose a historic image that is shot from an angle similar to Street View. Street View is made up of a series of still images. You may need to navigate slightly on the street to get a shot that matches. Street View has been shooting for years. Use the drop down timeline (highlighted here) in upper left of Street View that has the angle and lighting that works best for your Juxtapose

Archival photograph of paired with photograph I took in the same location.
Taylor Hotel entrance Circa 1920
Pro tip: bring along a print out of historic photo to line up you new shot. Maybe you’ll get lucky (like I did) and find a SUV parked in the right spot. 

Here’s a video that details my workflow for this project
You’ll see how I used the transparency feature in Google Slides to create two well-aligned images that I imported into JuxtaposeJS via Dropbox. JuxtaposeJS supports both vertical and horizontal sliders. Pick the orientation that does a better job of concealing or revealing the continuity and change. Once the images are “published” at JuxtaposeJS they can be imported into your web via an iFrame embed as I have done in this post.

Image credits:
Tom Torlino
Portland Ore Engine No 2
Taylor Hotel Entrance. 347 SW 3rd Ave Portland Oregon Courtesy of Oregon Nikkei Legacy Center ONLC 533

Free Multicultural Alaska History Series

I’m pleased to announce that this 6 book series was just named “2016 Best Textbook”  at the international iBooks Author Conference. “The iBAs“ are the only peer-nominated, peer-voted awards for best-in-class achievement with Apple’s iBooks Author.


I just finished teaching Alaskan Studies at University of Alaska Southeast’s MAT program in Juneau. My course was teamed with a Multicultural Ed class in the first three weeks of the on-campus session. We took a PBL approach and our cohort of 37 MAT students did a terrific job researching and designing six regional iBooks as models of culturally responsive teaching. More on their assignment here.

I’m proud to announce that the Multicultural Alaska series is now available free at iTunes.
Alaska’s West Coast- Thriving on the Tundra 
Arctic Alaska Life at the Top of the World
An Outsider View of Interior Alaska
Southwest Alaska- Where the Sea Breaks its Back
From Silt to Salt- Southcentral Alaska
Southeast Alaska- Close to Nature’s Heart

Each iBook begins with a regional overview focussed on the intersection of three factors – natural environment, the human environment, and the cultural expressions unique to the indigenous people of the respective region. Six-member teams collaborated on each overview and then each student designed a culturally-responsive lesson in their content area focused on that region. The iBooks are filled with interactive elements and extensive source material from Juneau’s newly opened Alaska State Library, Archives and Museum (SLAM).

Don’t have a Apple device? Download our books free as static PDF files.
Alaska’s West Coast- Thriving on the Tundra 2.5 MB
Arctic Alaska Life at the Top of the World 3.7 MB
An Outsider View of Interior Alaska 3.1 MB
Southwest Alaska- Where the Sea Breaks its Back 3.6M
From Silt to Salt- Southcentral Alaska 2.1 MB
Southeast Alaska- Close to Nature’s Heart 2.2 MB

Save Instructional Time with Screencasts

Here’s a “case study” in lesson design that demonstrates the efficiencies of offloading information transfer via screencasts.

Setting: I’m currently teaching Alaskan Studies at University of Alaska Southeast’s MAT program. My course is teamed with a Multicultural Ed class. We have a cohort of 37 students in the first three weeks of their on-campus summer session. Our face to face class time is critical and we want the students to get to know each other before being sent out across Alaska on their student teaching placements.

Goal: I wanted to open the course with a place-based activity that gave the students a creative way to share something about themselves. I decided to give them two PBL design options – creating a poetry-inspired Haiku Deck [ Lesson ] or a developing a geo tagged tour using Google MyMaps [ Lesson ]. During the same class, I wanted to get them introduced to WordPress and our course blog where they would be regularly posting.

All this was accomplished in a 3-hour class through use of short screencasts that explained each aspect of Haiku Deck, MyMaps and WordPress. Screencasts were made using Apple Quicktime Player and uploaded to a playlist on YouTube.

Bottom line: By investing about 45 mins to make screencasts (in advance), I freed up three hours of class time for student interaction and production.

You can view student products: Haiku Deck here and MyMaps here 

Here’s some student reactions to the workflow:

The “flipped” structure of this assignment was new to me, but eye-opening. Using YouTube and a course website to provide instruction without eating too much class time opens a number of possibilities for a teacher. Having that time instead for working on an assignment seems helpful for students, and it would free the teacher up to walk the room and help them individually with any problems they might be having. ~ Tim

This activity gave me a sense of fulfillment because I got to go at my own pace and actively create a project within a clear and manageable timeframe….The quick cadence of this activity was driven by Peter’s use of Youtube tutorials to deliver instructions and information about the project. This element all but cut out lecture time along with the inevitable (inferably painstaking) process of verbally answering repeated questions from students. In my experience as a student, verbal lectures and directions often cause me to get bored and then shut down, or to get lost and then shut down. The video clips smoothed over this issue and I anticipate utilizing this method in my future classroom. ~ Devin

It was fun, it has kept the entire class occupied for over two hours and I can see how this is an amazing learning opportunity and activity for the classroom. Allowing students a few different options to choose a way to creatively address a subject, giving them a set amount of time to accomplish the task and then providing a space to view their peers work in order to get ideas for the next activity. Brilliant. ~ Erin

Image credit: Flickr / eGuidry

Exploring History: 13 Document-Based Lessons

Exploring History IIII’m very pleased to share a new iBook just published by my Social Studies Methods class at the University of Portland.

Interactive iBooks available free at iTunes.
Static pdf version Exploring History Vol III (29 MB)

It features thirteen engaging questions and historic documents that empower students to be the historian in the classroom. The units draw from a fascinating collection of text and multimedia content – documents, posters, photographs, audio, video, letter and other ephemera. “Stop-and-think” prompts based on CCSS skills guide students through analysis of the primary and secondary sources. Essential questions foster critical thinking. All documents include links back to the original source material so readers can remix the content into their own curated collections.

My students worked for a public audience on our class blog and and pursued our three class goals:

  • Learn to think like a historian.
  • Become a skillful Instructional designer
  • Develop technical skills for production, reflection, growth and professional networking.

The lesson design process began early in the semester when students designed lessons in historical thinking skills based on the work of Sam Wineburg and the Stanford History Education Group (SHEG). They focussed on three key skills – Sourcing, Contextualizing and Corroborating. Then students identified essential questions worth answering and gathered documents to explore the question in an extended lesson design process.

Exploring History: Vol III was our PBL capstone and is available on iTunes in 51 countries around the world. Here’s a post (from fall ’13 class) that describes our project workflow (including how we utilized iBooks Author). Here’s Exploring History: Vol I created by my fall 2013 class. And Exploring History: Vol II designed by my fall 2014 class.

I’ll be doing a future blog post that features each student’s DBQ, but for now here’s the US and World History lessons in chronological order:

  1. Finding Egyptian Needles in Western Haystacks 
by Heidi Kershner
  2. Pompeii by Caleb Wilson
  3. Samurai: Sources of Warrior Identity in Medieval Japan 
by Ben Heebner
  4. The Declaration of Independence by David Deis
  5. Reconstruction in Political Cartoons 
by EmmaLee Kuhlmann
  6. Regulation Through the Years 
by Chenoa Musillo Olson / Sarah Wieking
  7. Battle of the Somme by John Hunt
  8. The Lynching of Leo Frank by Jeff Smith
  9. The Waco Horror by Alekz Wray
  10. The Harlem Renaissance by Monica Portugal
  11. A Date of Infamy by Mollie Carter
  12. Anti-Vietnam War Imagery by Felicia Teba
  13. Examining the Ongoing Evolution of American Government by Eric Cole