The World Is My Audience: Using iBooks Author and Book Creator to Change Student Writing

The World is my AudienceBackstory: I’ve long been impressed with Jon Smith’s exploration of student publishing. Recently I saw his post at the Ohio Resource Center and asked Jon if he would cross post on my blog. This is his second post on Copy/Paste. Here’s his first guest post which features a video reflection by his students. 

Jon Smith is a technology integration specialist for Alliance City Schools. He was a special education teacher for 12 years and continues to have a desire to allow special education students to create wonderful content to enhance their learning. Jon’s daily duties include teaching students about technology tools, helping them with projects, and giving professional development to teachers and district staff. He is also an instructor for the Communicate Institute. Jon teaches a graduate-level course to teachers on engaging the twenty-first-century learner with technology. You can contact Jon at his website. His student iBooks are available here ~ Peter Pappas

The Beginnings

I was teaching special education students in grades 5 and 6 in an inner-city school in Canton. Time was going by, and students continued to struggle with writing. I was determined to make a difference and change these students for the better. They were going to become great writers if it killed me. While my goals were commendable, they weren’t being achieved to the degree I wanted. Then, two years ago, Apple introduced a software product called iBooks Author, and things would change for me forever.

For the first time, people were given the opportunity to self-publish in an easy manner. I saw this software as an opportunity for students to have a global audience for their writing. Blogs and other means of attracting a global audience have been around for a while, but this was something truly different, and I ran with it. Students were excited to be writing for someone other than their teacher. Engagement increased. Time on task increased, and the energy in the classroom changed to something you can normally only dream of.

Within three months we had written and published three iBooks in Apple’s iBookstore. We were graphing the downloads in the hall on chart paper, estimating how many downloads we would have by the end of the year, and planning our next books. Comments from all over the globe came pouring in, and it meant a great deal to the students. For the first time in their lives, they had a real, authentic audience for their work.

I soon changed jobs and moved to Alliance City Schools. The iBook ideas continued, and my Alliance students soon published two iBooks using iBooks Author. Again, things were going smoothly until one day when I met Pam, a speech and language pathologist for one of the elementary schools in Alliance. This begins the journey of my use with the Book Creator app.

Working with Autistic Students

Pam was referred to me by our district network manager. She was in need of instruction on using iMovie on her iPad. I knew I could help her, and so we met to discuss using the iMovie app. She explained to me that she had a group of fourth grade autistic boys who needed some serious motivation and help. They weren’t interested in doing any kind of work at all, and she thought iMovie would help. I asked her what they were struggling with, and she mentioned social skills. Immediately my mind went from iMovie mode into something else, something more powerful.

I explained to Pam that I had another idea. It was an app I recently learned about. I was looking for a group of guinea pigs, and this was the perfect opportunity for me to try Book Creator out with a group of students. Pam explained to me that this was a tough group of kids. She eyed me cautiously when I explained that we were going to write a book using the Book Creator app. And she looked at me like I was on drugs when I told her that we weren’t only going to write a book but that we were also going to publish this book for the entire world to download.

listen-to-the-driver
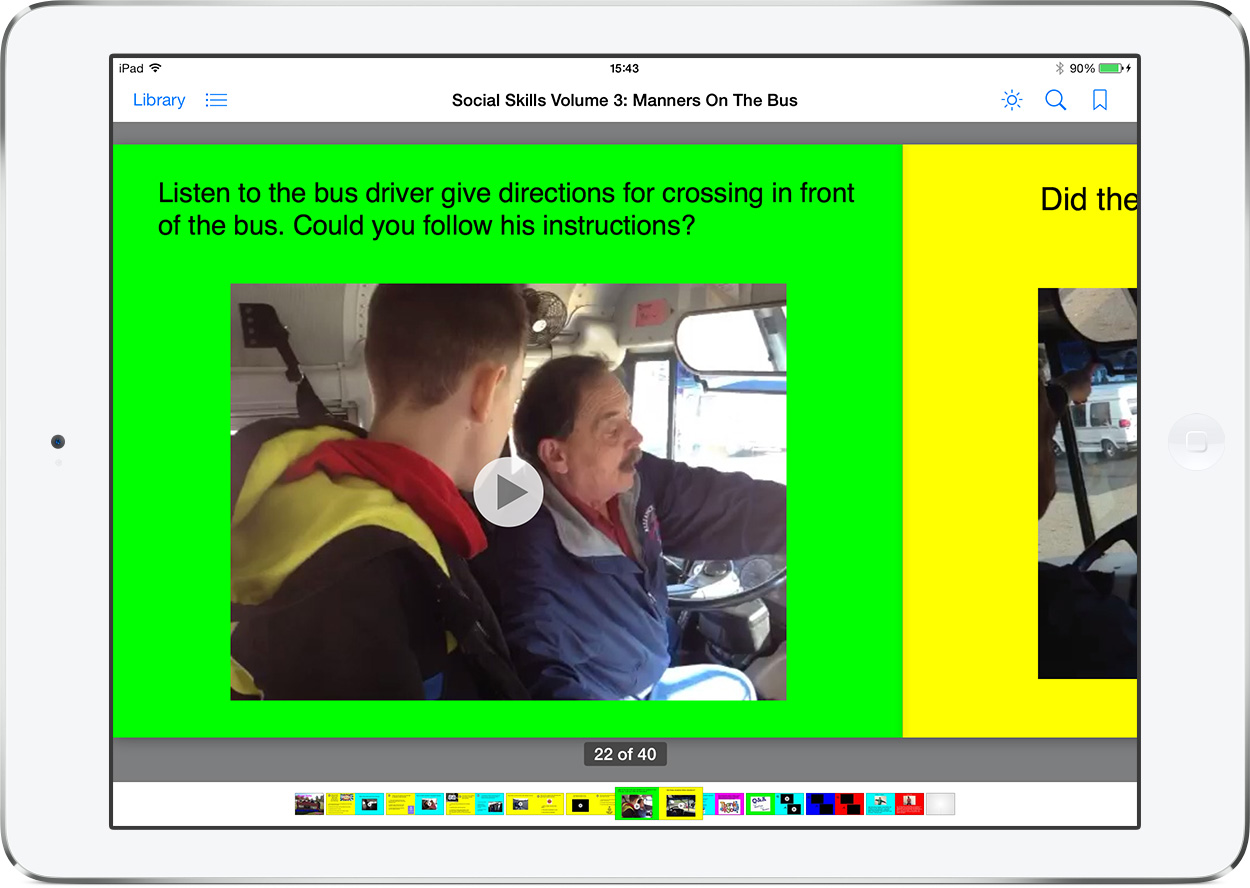
I began meeting with her and her students once a week. I explained to the students that they would soon be globally published authors. They were so excited about their book, it was contagious. We began using the Book Creator app to make videos of inappropriate social skills interactions (this wasn’t difficult because this is what they did on a daily basis). We also made videos of appropriate interactions (great learning opportunity for the kids). Students started using Pam’s iPad to write down information and create their stories and author bios. The students also realized they could record their voices using the app, and they did. They believed this would help them be better readers. Adding their own pictures was icing on the cake. After a month of work, the book was ready, and we published it in the iBookstore. The downloads started flying in, and this is where the real transformation occurred.

The students in Pam’s group were thrilled about the downloads. They put a map in the hall and began to chart which countries had downloaded their book. This seems like such a small thing, but to these students it was spectacular. These students who were afraid of talking to others, had few friends, and were thought of as outcasts soon became the stars of the school. The students were talking to kids in the hall, explaining why there was a red pin in Japan and Norway and Canada. One student’s parent, who never came to any IEP meetings, showed up for the first time. She was so excited to see what her son had done, that she came to the first meeting at the school in four years. The students couldn’t stop writing and wanted to make more and more books. They had so much fun and learned so much while using this app, that they have started a series of social skills books. As of today, they have written and published three iBooks in the social skills series.

Projects

I plan on using the Book Creator app with more and more schools as the year goes on. I have teamed with other teachers in the district, and we have written and published iBooks using the Book Creator app with kindergarten students, first graders, and of course our fourth and fifth graders. The ideas are endless, and the Book Creator app is the simplest and most robust app for writing books hands down. I would also like to expand the use of the app to the high school, where I spend most of my days. We have a one-to-one iPad program with the freshman class, and this app is ideal for having kids demonstrate their knowledge in a variety of subjects. I would also like to see students become their own self-publishers by using the app.Song about Mississippi

What I’ve Learned

Throughout the process of writing and publishing books, I’ve learned a few things. I would like to share those with you now, because this is such a powerful app and because publishing student work is such a powerful idea that I want every teacher and student to have this opportunity.

  1. Apple is picky. But using the Book Creator app is so easy, it’s nearly impossible not to pass Apple’s strict publishing standards.
  2. Writing and publishing books has enormous potential to change the lives of students and the way they interact with the world around them.
  3. Marketing your book makes a huge difference. I am very active on Twitter, and if it weren’t for all my followers, retweets, and mentions, we would not have had the successes we did. Twitter is a great place for free publicity.
  4. I’ve learned that people like to read what students create. We have had nearly 32,000 downloads of our class-written iBooks. This number keeps climbing daily, and it is very exciting to watch.
  5. I’ve also learned that writing and publishing books with your students is addicting. Currently we have 44 iBooks available in the iBookstore, and this number will continue to grow.

I would like to close this article with a few thoughts and a quote. I think students need to contribute more in the classroom. They need to be creating content as part of the learning experience. They need to show us what they know, and they need to be able to explain it. Using Book Creator has the potential to transform learning for you and your students. Students and teachers need to share what they do. This really makes a difference in the authenticity of the learning. I truly believe that students want to share what they do, and when they have a bigger audience, the work gets better.

When students create for the world they make it good. When students create only for their teachers, they make it good enough. —Rushton Hurley

Images supplied by Jon Smith

How to Add Scalable Vector Graphics (SVG) Images to iBooks Author

iBA SVG enlargedHere’s another great iBooks Author (iBA) “how to” – cross posted from Dr. Frank Lowney (Projects Coordinator, Digital Innovation Group @ Georgia College). See Frank’s original post a watch his demo video here. Frank writes:

The primary advantage of Scalable Vector Graphics (SVG) files is that a very small file can be scaled up to yield large images without the aliasing (jaggies) that appears when a bitmapped graphic is scaled up. SVG files are resolution independent, usually non-photographic and carry the suffix *.svg. There are lots of free SVG files available on the Internet and there are many applications for creating SVG files such as the free, open source Inkscape. For an excellent primer on vector graphics, see this Wikipedia article.

However, it is not possible to use SVG images directly in iBooks Author. If you attempt to drag and drop an SVG file onto an iBooks Author project, nothing will happen. You’ll get no error messages or feedback of any kind. Similarly, apps in the iWork suite (Pages, Keynote and Numbers) will also refuse to accept SVG files. Since it is important to keep the size of iBooks Author output low for easy downloading and to avoid the 2 GB limit in the iBookstore, we need to pursue this further.

The iBooks Author application has its own Text, Shapes and Graphs menus with which a number of vector graphics can be created. Another option is to use the vector graphics created by Keynote, Numbers and Pages. These can be copied and pasted directly into an iBooks Author project. Graphics created in iBooks Author or any of the iWorks suite applications are vector graphics in PDF containers, not SVG files. PDF files can contain text, bit-mapped graphics and vector graphics. [The $99 OmniGraffle application is a considerably more sophisticated graphics toolset and is capable of exporting both SVG vector drawings and PDF vector images. The latter are compatible with iWork suite and iBooks Author.]

That’s useful but there is an Internet full of already drawn SVG images that are in the public domain or CC licensed. It would be a shame not to have access to that vast library of free vector images. The trick is to use this free on-line conversion service to convert SVG to PDF and then drag and drop that PDF directly into an iBooks Author project or into one of the iWork apps or OmniGraffle for further manipulation.

Download an *.ibooks file here that shows how vector graphics created in iBooks Author compare with vector graphics converted from SVG files.

Vector image creation - Cheat Sheet
Vector Image Creation and Editing – Cheat Sheet was created by First Site Guide Team>.

How to Use iAD to Create an External Video Widget for iBA

iAd

The three iBooks in my WWII Homefront USA series started with an idea for single iBook. Then as I began to uncover so many long-forgotten videos,  I realized there was a trade off between creating a media-rich iBook and keeping the file size manageable.  I considered keeping file size smaller by simply linking to the videos from the iBook. (I would provide a hyperlink in the iBook and the reader would tap on it to be led to the video on YouTube or Archive.org.) But that required that the reader be on a network to view the iBook’s videos. And I didn’t think that a hyperlink was a very visually appealing approach.

Use iAd Producer to create a high quality HTML widget for iBooks Author without writing a single line of code.

So my single iBook project idea turned into three iBooks with file sizes running roughly 600MB each. I carefully edited the videos and used file compression – but the 13-18 videos in each iBook demanded a lot of file space.

I was pleased to hear that my go-to guy for iBooks Author –
Dr. Frank Lowney (Projects Coordinator, Digital Innovation Group @ Georgia College) had posted a video how-to for using iAd Producer to create external video widgets of iBooks Author projects. No coding required!

He agreed to let me cross post his work here with a slightly edited version of his original screencast. 

Frank posts – The iAd Producer application from Apple has grown considerably since its inception. Originally, it was a highly specialized application that created advertisements for mobile devices from Apple. Those iAds were composed of sophisticated HTML, CSS and Javascript.

Since that inception, it has been expanded to create iTunes LPs for music albums sold in the iTunes Store and iTunes Extras for video sold in the iTunes Store. These, too, rely upon HTML, CSS and Javascript web technologies. Most recently, iAd producer has added iBooks Author HTML widgets to its repertoire. Thus, the following screencast tutorial showing how easy it is to use iAd Producer to create a high quality HTML widget for iBooks Author without writing a single line of code.

This example focuses on creating an HTML widget that plays a video hosted on an external server. This keeps the size of your *.ibooks file down making for quicker downloads and avoiding becoming a burden to iPads already nearly filled to capacity with other books and media.

You can see Frank original video here - it includes comparison of various video strategies for iBooks Author. Download the example book to an iPad to get an even better view of how this looks and feels in the hands of your audience.

Download iAd Producer (free developer registration required)

I highly recommend  Frank’s iBook The Coming ePublishing Revolution in Higher Education
on iTunes. It’s an insightful guide to etextbook revolution – winners, losers, and the factors that will determine the outcome. (67 pages, 20 graphics, 28 media files, 25 video files and 5 interactive widgets.) A bargain at only $0.99!

DBQ Lesson Plan: Shopping with Historic Documents

Upchurch Family 1896While exploring my Twitter feed I came across a very inventive 8th grade history lesson created by John Fladd ~ twitter@woodenmask

At the core of this lesson are some rich historic source material – the 1900 federal census, 1897 Sears Catalogue historic portraits and biographies.  John agreed to this cross post from his his blog Teacher Toys: Christmas Shopping Without a Flux Capacitor. I urge to visit his blog – he’s a great writer with many ideas to share. Readers should access his site to see additional resources for this lesson and correlation with standards. Note: John gathers student feedback via his GoogleVoice account, though students could submit their choices using other means.

1897 Christmas Shopping Project

  1. Each student chooses a photograph of an American taken in (or around) 1897 and reads a small secondary source statement about him or her.
  2. The student transcribes information from that person’s 1900 Federal Census form.
  3. The student chooses three Christmas presents from the 1897 Sears Roebuck Catalog – one for $1.00, one for $3.00 and one for $5.00.
  4. The student takes a picture of each of his or her choices, then calls my voicemail and records a message, describing one of his or her items.


Tom Tate,

Step 1 – The Photos

After trying several different approaches, I discovered that the easiest way to find photographs of Americans in 1897, was to type “1897” in Google Images and Flicker. As it turns out, there are a lot of people out there who like to share their antique photographs.

Almost every antique photo I found included some background information – “This is my Great Uncle Cyrus, who lived in Possum Flats, Arizona, who later went on to invent the electric pogo-stick…”

It is this secondary source information that allowed me to find census data for some of these people. I included a copy of this information to students in their document packets.

1900 United States Federal Census

Step 2 – Census Information

As it turns out, finding photos of people in 1897 isn’t as hard as finding information about them. I was able to find a 1900 Census form for about one picture in three using Ancestry.com. I downloaded the highest quality image of each that I could.

I had students transcribe the original forms onto a blank census form, provided by Ancestry. The idea behind this was to get students used to dealing with primary source information – reading the handwriting, thinking historically, etc… Having them copy the information also made it more likely that they would actually read it.

I discovered that the best way for them to read the original census forms was on a computer screen, so they could magnify sections as necessary. (As students chose their people, I downloaded all relevant documents onto their individual USB drives, for use at school or home.) We did the transcriptions in the Computer Lab.

One interesting lesson for the students was that bigger magnification doesn’t necessarily mean more legibility. Students invariably magnified difficult-to-read sections as much as possible, which tended to pixilate the writing and actually make it harder to read. I had to remind them several times to back off on their magnification to read entries better. They were deeply suspicious at first – this seems counter-intuitive – but eventually MOST of them decided I might know what I was talking about.

sears bikes 1897

Step 3 – Shopping

This step was probably the most fun for my students. By the time they had read primary and secondary source material about their particular person, they knew enough about them to do some thoughtful shopping.

In most cases. (Fourteen year-old boys, though, given a choice, will buy anybody a gun, under any pretext whatsoever.) I had them fill out this worksheet, which kept them organized and gave them a script for when they needed to make their recording.


Step 4 – Photographing and Recording

On the advice of a much-smarter and experienced colleague, I bought several goose-neck lamps to provide enough light for students to take pictures of their entries. (The students complained about a burning-insulation smell. I later discovered that there was a plastic warning-label inside each lamp that needed to be removed.)

I tried to come up with a graceful and elegant way for students to submit their photographs electronically, but in the end, the easiest solution was to have students bring the camera to me as they finished taking their pictures and I downloaded the images directly from the memory card in the camera. I borrowed digital cameras from two other classrooms and set up three stations. This worked pretty well.

At this point, my students had turned in two other projects via messages on my GoogleVoice account, so they had the mechanics of that down pretty well.

The End Product:

Christmas Shopping for 1897 from John Fladd on Vimeo.

Image Credits:
Upchurch Family 1896 flickr/Pioneer Library System

1900 Federal Census showing Harry Truman as 16 year old Ancestry.com

Tom Tate, son of Captain Tate’s half-brother Daniel Tate, posing with a drum fish in front of 1900 Wright glider Library of Congress  LC-W851-86

Sears Bike 1897 flicker/Slowe

DIY Textbooks With iBooks Author

textbook screenshotA recent article in the Pittsburgh Post-Gazette caught my eye. “North Hills Teachers Write a Textbook for Online Curriculum”

In eighth-grade social studies classes at North Hills Junior High School, there’s no sleeping through videos, no hiding in the back of class to avoid being called upon and no student excuses about forgetting the textbook, notes or class materials. That’s because just about everything students use for class is online, including the textbook, which was written this past summer by social studies teachers Rich Texter, Joe Welch and Larry Dorenkamp. It was edited by reading teacher Jill Brooks, who made sure it was written at the appropriate reading level. The result is the students spend their class time multitasking with technology… More

The best way to motivate our students was to get rid of traditional textbooks.

I invited the Rich Texter, one of the project teachers / textbook developers, to do a guest post on the project. He kindly supplied some screenshots and the following post. (Note: the textbook is not available on iTunes). Rich on Twitter

Textbook sidebarTwo years ago, Larry Dorenkamp was thinking about how cool it would be to teach in a classroom that enabled him to teach his students about Social Studies, and have the kids excited about learning it. In his opinion, the best way to do that would be to get rid of the traditional textbooks and jump on the technology train. So, Mr. Dorenkamp approached the Assistant Superintendent for Curriculum Assessment and Special Programs, Dr. Jeffrey Taylor, about the possibility of using a classroom set of MacBooks, instead of a traditional textbook. It turns out that Dr. Taylor was very intrigued by making the 8th grade social studies classroom a digital learning environment. After the initial meeting, we–the three 8th grade social studies teachers (Mr. Richard Texter, Mr. Joseph Welch, and Dorenkamp)–sat down with Dr. Taylor and the building principal, Beth Williams, for an informal discussion. We discussed our vision of how this digital classroom would look and how it would function. Dr. Taylor wanted to ensure that the learning needs of the students would be met, as well as–if not at a higher level–than in a traditional classroom. The vision was that this would allow the students to more freely explore the 8th grade curriculum, increase student engagement, enhance understanding, and critical thinking skills. Dr. Taylor had discussions with the school board about a pilot program of a Digital Based social studies classroom. The board approved the program and purchase three classroom sets of MacBooks and iPad 2’s for our classroom. The three social studies teachers collaborated, throughout the school year, to create activities that would engage students, while allowing them some options in choosing what they do. We also worked to build assessments that would allow students to do more than just measure memorizing dates, places and facts.

We can tailor our book to regional history. Plus, we can update it whenever we want.

When Apple came out with its iBook Author, we decided to write a 8th grade text that was custom-made for OUR students. We liked the idea that the book would be aligned to our curriculum at North Hills, and that it could be aligned to the state-specific standards that we need to cover, in Pennsylvania. Instead of using a book that was written to be marketable to big text book states like California and Texas, we wanted to provide the students with information that was more pertinent to Pittsburgh and Pennsylvania; we wanted to engage our students.

iBook builder allows you to make your textbook interactive; students can mark up the text and add their own notes. Bold words can be touched for an instant definition. If a student is struggling to pronounce a word, the book can speak the word for the student. Interactive maps and charts can be placed in the book, in addition to videos. We placed Keynotes, in certain sections, to highlight important information from a section. Interactive checks for understanding, that give the student immediate feedback, are at the end of each section and Unit.

The iBook continues to be a work in progress for us, we will continue to update the book to meet our needs. That is our favorite part of iBooks author as we need to update the book we can do it very quickly. So instead of waiting 5 to 10 years to be on cycle for a new textbook we can edit and update ours when ever we see the need.

textbook screenshot-1