How to Run an EdCamp via Zoom

How to Run an EdCamp via Zoom

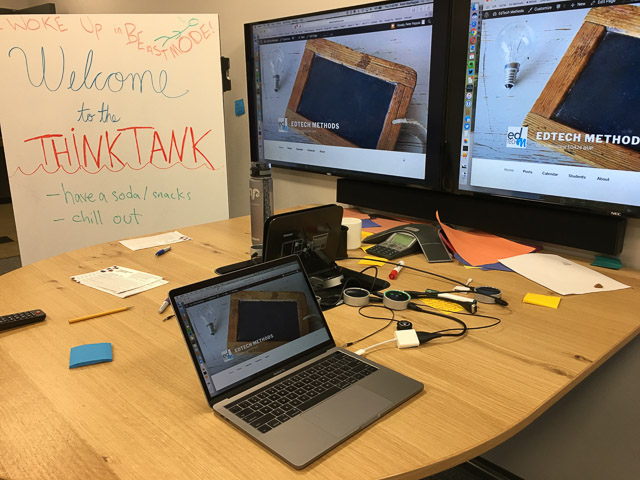
I recently ran a edcamp style morning session for our incoming MATs at the University of Portland’s School of Education. Our session goals:

  • Provide a framework for students to explore ed tech in small project-based learning teams
  • Model a student centered learning space that takes the instructor out of center stage.
  • Reinforce that ed tech tools are more than bright shiny objects – they are a tools to inspire your student to investigate, collaborate, create, drive change and take action.

In advance, I created a Google site – “Pandemic Teachers’ Toolkit” that profiled ten free (or freemium) edtech apps. Each app page included a brief overview, how to log in, samples of the app in action, a how-to video on using the app, and instruction on how to get a sample project from the app to a Padlet showcase. The apps were numbered 1-10.

On the morning of the session, I logged in 42 students and I opened with a brief intro and an overview of the morning’s activities. I did a short presentation on the apps using Keynote with some screen shots that highlighted each app and what it could do. I then used Zoom’s built-in breakout group tool to create random groups of four students each. Each breakout group was assigned to explore their corresponding numbered app. The suggestion was for each student in the breakout group to explore the assigned app in parallel fashion and offer help to each other as needed. When they completed a product with the app they posted it to the corresponding Padlet along with comments on working with the app.

As Zoom host I was able to drop in and out of breakout groups offering support as needed. If anyone had a question they could message me via Zoom. After about 30 minutes of work time we all got back together and shared observations. For example – you can’t be in Zoom and Flipgrid simultaneously – the are both fighting over your camera. (Why didn’t I think of that?)

Then we repeated the process and I created 10 new random teams. Some student found themselves back at the same app. So they did not agree to join that group. I was quickly able to see that and assign them to a new group. Students spent about another half hour exploring the second app. They again posted their work and observation to the corresponding Padlet.

I should note that their app-posts were very clever and creative. And their comments were spot on. As a closer, I provided a Google Form exit ticket. Their responses demonstrated that they saw the experience as very valuable and that it achieved it’s goals.

Here’s a two of the exit questions and student responses.

What’s one thing you learned about yourself today?
  • I learned that I enjoy exploring new technology when it is explained well enough.
  • I love working on my own! It is my first choice when it comes to work options. However, I did need my partners at times so I’m glad they were there to help me!
  • I really enjoy meeting new folks outside my cohort! And I’ve become much more comfortable with online teaching over the summer term.
  • I am better at navigating new apps than I thought I would be.
  • I need to try something before I understand it, so I appreciated the time to do so.
  • I enjoy playing around with the different tools within an app to help me understand the best use of my creativity and instruction.
  • I learned that I’m actually a pretty quick learner with these different platforms, which makes me feel better going forward into the school year next year!
  • I liked being able to figure out to use the tools. I always find it more engaging to learn by doing instead of being told how to do things.
What’s one thing you learned about edtech today?
  • These things are free! And a lot of it is integrated with programs I already use. Great stuff!
  • I have a lot more free, realistic options available to me than I knew about before this morning.
  • I had heard of some of these online resources before but hadn’t used most of them – this was a cool opportunity to learn how to use these resources, I’ll definitely be incorporating some into my class.
  • How user-friendly most of the apps are….I was pleasantly surprised.
  • There are far more resources than I would’ve thought. They were all a lot easier to use than I would’ve thought, too! For someone who struggles with technology, they were surprisingly user friendly.
  • So many other options for distance learning! I’ll be spending some time just playing around with these apps/sites.
  • There are a variety of accessible edtech tools that I was previously unaware of that could make remote teaching more engaging.

Collaborating with iBooks Author

I’m pleased to be a member of the Apple Distinguished Educator Class of 2017. At next week’s Houston conference, I’m going to give an iBooks Author workshop on how to manage collaborative book design. Here’s some of what I’ll share. You can find more info at this resource site Get Started with iBooks Author

If you’ve ever worked with a group of students in a computer lab you know how much time can be lost while they explore fonts and other design elements. For greater efficiency I first guide the students through some template options while we explore sample multi-touch books. We arrived at consensus and I pre-loaded a template chapter into each work station.

iBooks Author does not presently allow for multiple users to collaborate on the same file. So when I work with students, I have them all work on individual chapters (or sections of chapters) all using the same iBA theme. They share their completed chapter file with me via shared drive. I copy / paste their chapter into one final collaborative iBA file.

Note: Glossary entries cannot be copied and pasted from one file to another. So if students plan on adding glossary to a collaborative project, that will need to be done in the final compilation file. Likewise students should not reference individual page numbers in their chapter contribution, those will change in the final compilation file.

Click this link for my iBooks Author YouTube Playlist

The computer lab is for production not planning. I staged a series of assignments that all folded into the development of a finished iBook. For example, I asked students to write a blog post reflecting on what they learned from developing their chapter. That reflection later became the concluding section of their iBook chapter. By the time we were heading to the Mac lab to get started with iBA, they had their chapters finalized with all the content for their iBook chapter stored on a drive – including all image / sound / text files, citations and URLs. Students were able to copy / paste all their content into their iBook chapter in only a few hours of lab time. iBA Tip: If you don’t have a Mac / iBA station for each student, you could have a production team transfer the work of their peers into finished form. 

If you’ve every worked with a group in a computer lab you know how much time can be lost while students explore fonts and other design elements. To maximize our lab time, we discussed some template options while we were looking at other sample iBooks. We arrived at consensus and I pre-loaded a template chapter into each work station.

Chapters and sections of chapters can be easily re-arranged in an iBook. Just highlight them and slide to new location. You can also right click a chapter or section and cut, copy, duplicate and paste. You can even use those commands to move them between two different iBA projects that you have open. BUT moving pages is not allowed. Any new pages you add to a chapter (or section of chapter) appear at the end of the chapter (or section). That’s not a problem if you are editing flowing text. It is a problem if you are using blank pages with many objects. In that situation, you can select / all images on a page. Copy them and paste them on a new page.Fortunately images, widgets and shapes can be copied and pasted to new pages. They can even be copy / pasted from one iBA project to another.

Since it’s difficult to rearrange pages, have students create a first draft in Apple Keynote (or PPT, Google slides). They can create a rough approximation of each page and note any media that might accompany text.

One common problem for students is not messing up their chapter image. Each chapter opener has a placeholder to drag an image into on the page build. If you do that, you will see the image when you view the full page and see the image (in strangely centered display) in your Table of Contents (TOC) view.

If you delete the placeholder and simply import an image into the start of the chapter, you will see the image in the full page, but it will be missing from the TOC view. Once you have done that, I have not found a way to restore the image placeholder. (For example when working on a recent student publication, a few students deleted the placeholder and the only remedy was to rebuild the entire chapter. Grrr) If you start messing with the image in the TOC view, you will find that whatever image you insert into Ch 1 (for example) will become the image for every other chapter.

Students need to be careful entering titles of their chapters (or sections). If you click on the “Untitled” placeholder text you’ll see a blue line around it. (red arrow – right) That signifies that the chapter title will be repeated in the TOC view. If students accidentally delete that text and blue line, then any title that add will not appear in the TOC view. I tell students that the safest way to create their own chapter title is to change the title in the page view on the left. Tap on the “Untitled” and it will become active and editable. (red arrow – left). That title change will also appear on the chapter title page.
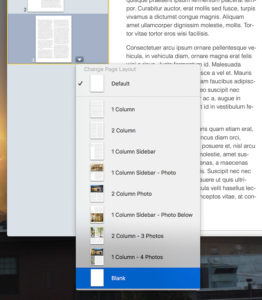
Unless you’re creating a largely text-only iBook, I find that chapters with flowing text are much more challenging to manage. Inserted widgets and images have a habit of repositioning as text is edited or deleted. Therefore I tell students to insert “Blank Pages.” That allows them to add widgets, media and text boxes with full control of the page. Note that even though the “Default” page looks blank, it isn’t. It has flowing text which will link to adjacent pages.


Remind students to clean up any of the placeholder font that iBA inserts into widgets. iTunes will not approve an iBook that contains any placeholder text. (“Lorem ipsum dolor sit amet, donec ornare vitae…”)

A great feature of iBA is the ability to copy and paste styles. It works with text, images, shapes and widgets. Those options are not part of the default toolbar. But if you right click the toolbar, you can add them to your custom toolbar.
Acceptable file formats for iBooks Author

Note that you must have the actual image file to import into iBA

  • Image files: JPG, JPEG, PNG, GIF Note: The recommended file format is JPG. If the image includes transparency, PNG is recommended.
  • Video and audio files: MP4 video files and M4A audio files. Note: For the Media widget, you can add a video file or an audio file (in a format QuickTime supports) to your book. You can convert other types of files using iMovie, QuickTime Player, or Compressor.
  • As an alternative to loading the actual video we can use a YouTube embed widget at Bookry to embed a video viewer into the iBook. Here’s a how-to video for creating Bookry widget and embedding in your iBook.
  • Keynote  presentations are fully functional in iBooks Author. These presentation could have animated features through use of slide builds and transitions.

Sharing individual chapter of collaborative books. I typically have each student export their individual chapter as a PDF using iBooks Author’s built in export tool. Then we upload the PDF version of their chapter to SlideShare. Students then use Slideshare to embed a viewable version of their chapter in their final reflection post on the publishing project. See samples from our class WordPress site here. Note: While the chapters are static PDFs, it does create a showcase of their iBook chapter for viewers without Macs, iPads or iPhones. It also serves as searchable source for their individual topic.

Portland to March for Civil Rights Hero – Minoru Yasui

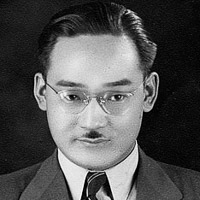
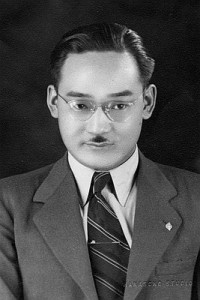
Minoru “Min” YasuiOn the evening of March 28, 1942, Minoru “Min” Yasui, deliberately violated the racially discriminatory curfew against Japanese Americans to test its constitutionality, walking on NW 3rd Avenue in downtown Portland. Min’s lifelong fight for justice and equality led to his recognition as the first Oregonian to be awarded (posthumously) the Presidential Medal of Freedom.

At the age of twenty-six, Yasui put his professional career and his personal liberty on the line for justice. He spent 9 months in solitary confinement at the Multnomah County Jail as he appealed his case to the U.S. Supreme Court. He was released from jail in 1943, only to be sent to the Minidoka American concentration camp in Idaho. More 

Join us to retrace Min’s historic walk for social justice on March 28th 

Please join us on Monday, March 28, as we retrace Min’s historic walk from his law office in the Foster Hotel in Old Town, to the former site of Police Headquarters on SW 2nd Avenue and Oak Street. Gather at Oregon Nikkei Legacy Center (121 NW 2nd Avenue Portland Ore 97209 map) at 4:30 pm for the short 6 block walk followed by a program in the foyer and reception in the offices of Stoll Berne at SW Second Avenue and Oak Street. Download flyer 389KB pdf

Yasui was awarded the 2015 Presidential Medal of Freedom, the highest civilian award in the country. The Oregon Senate and House unanimously recently passed a historic bill designating March 28 of each year as Minoru Yasui Day. More from the Min Yasui Tribute Project

Never Give Up! – Trailer from Minoru Yasui Film on Vimeo.

Minoru Yasui was born 100 years ago in 1916 in Hood River, Oregon, son of Japanese immigrant parents. He was the first Japanese American to graduate from the University of Oregon School of Law, and the first Japanese American member of the Oregon State Bar.

After the war, he moved to Denver, Colorado, where he continued to fight for human and civil rights of all people. In the 1970s-80s, he spearheaded the national movement for redress: an official apology and reparations for Japanese Americans imprisoned in the World War II camps.

In 1983, he returned to Portland to reopen his wartime case in the U.S. District Court of Oregon. While his conviction was vacated, the court denied his request for an evidentiary hearing, which he appealed. His case was pending in the Ninth Circuit Court of Appeals when he died in 1986. Minoru Yasui is buried in his beloved hometown of Hood River, Oregon.

Image credit: Holly Yasui / Oregon Encyclopedia link 

Uprooted: Russell Lee FSA Photo Exhibit

Uprooted from Uprooted Exhibit on Vimeo.

During the forced removal and incarceration of Japanese Americans, some 33,000 Nikkei left concentration camps to work as seasonal farm laborers, often in the sugar beet industry. UPROOTED introduces their story. This traveling exhibit features a selection of images from federal photographer Russell Lee’s documentation of farm labor camps in Oregon and Idaho. Through Lee’s photographs, new research, and firsthand accounts from farm laborers themselves, the exhibit uncovers the rarely told story of life in the camps.

Oregon Nikkei Legacy Center
February 11th to June 19th. 
121 NW 2nd Ave. Portland, OR 97209

Uprooted Exhibit 07

The Oregon Cultural Heritage Commission is proud to present Uprooted: Japanese American Farm Labor Camps During World War II. The exhibit features a selection of photographs from Russell Lee’s documentation of Japanese American farm labor camps near the towns of Nyssa, Oregon and Rupert, Shelley, and Twin Falls, Idaho. This is the first time many of these images have been exhibited. As a photographer for the Farm Security Administration (FSA), Lee captured nearly six hundred images of the Nikkei wartime experience. From 1935 to 1944, the FSA’s documentary photography program produced approximately 175,000 black-and-white film negatives and 1,600 color images.

Visitors will learn about Japanese American farm labor camps through Lee’s photographs, interpretative text panels, and a short documentary film featuring firsthand accounts about life in the camps. The exhibit’s website includes additional photographs, historic documents, video clips and transcripts from oral history interviews, and two lesson plans - How to Read Documentary Films and How to Read Documentary Photographs (Note: I developed both lessons).

Uprooted Exhibit 05

This exhibit was supported by grants from the National Park Service, Japanese American Confinement Sites Preservation Program; the Idaho Humanities Council, a State-based Program of the National Endowment for the Humanities; the Fred W. Fields Fund of The Oregon Community Foundation; the Malheur County Cultural Trust; and the Rose E. Tucker Charitable Trust.

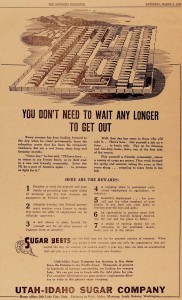
Farm Labor ad from the Minidoka Irrigator (camp newspaper)For more information on this project please contact the Oregon Cultural Heritage Commission. For questions regarding the JACS grant program, please contact Kara Miyagishima, Program Manager, Japanese American Confinement Sites Grant Program, NPS, at 303-969-2885.

Click ad on left to enlarge  For more photos see Uprooted Photo Gallery 

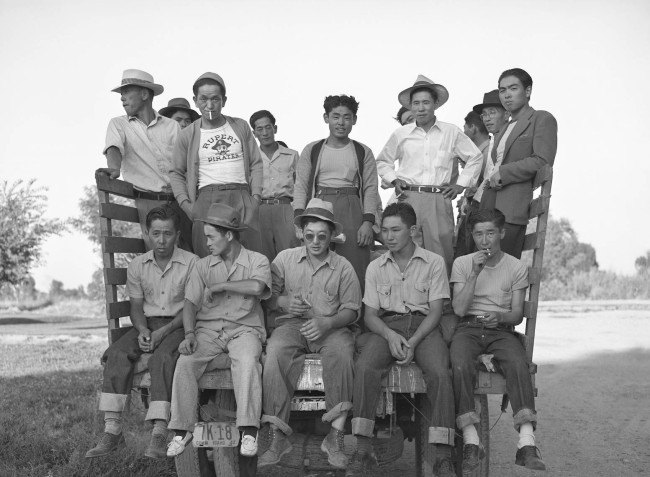
Men on truck: Many of the single men and families came to the Rupert, Idaho camp from Minidoka, Heart Mountain, Manzanar, and Poston. The seasonal leave program drew a mix of people, some with previous agricultural experience and others without. Library of Congress, Prints & Photographs Division, FSA-OWI Collection, LC-USF34-073890-D.

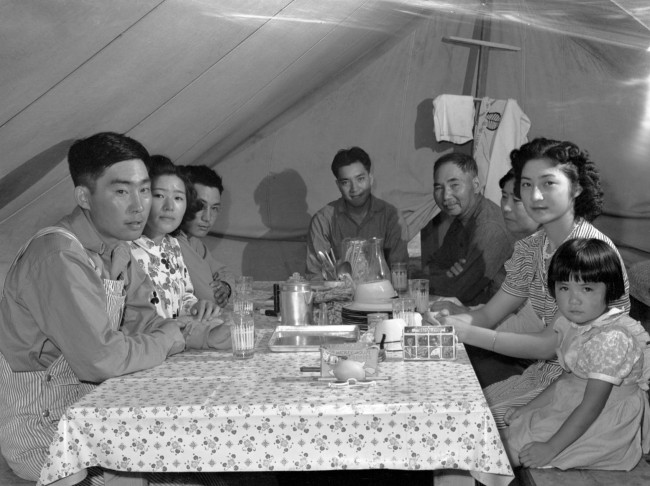
The Ouchida family at the Nyssa, Oregon farm labor camp, pictured clockwise from the lower left: Jack, Shizuko, Henry, Thomas, Kiuda, Shizuyo, Mary, and Rosie. Library of Congress, Prints & Photographs Division, FSA-OWI Collection, LC-USF34-073354-D.

Newspaper Ad “You don’t need to wait any longer to get out.” From the Minidoka Irrigator.
Sugar companies posted recruitment notices and advertisements in public spaces throughout the camps, as well as in camp newspapers. Such advertisements emphasized seasonal labor as an opportunity to leave confines of camp, but also marketed the work as the patriotic duty of Japanese Americans, ignoring that they had been incarcerated and denied their civil liberties.
National Archives and Records Administration, Washington D.C., Record Group 210, War Relocation Authority.
 

Photo Exhibit Locates Subjects of WWII Images

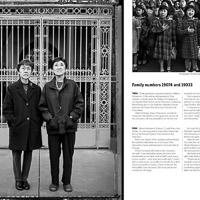
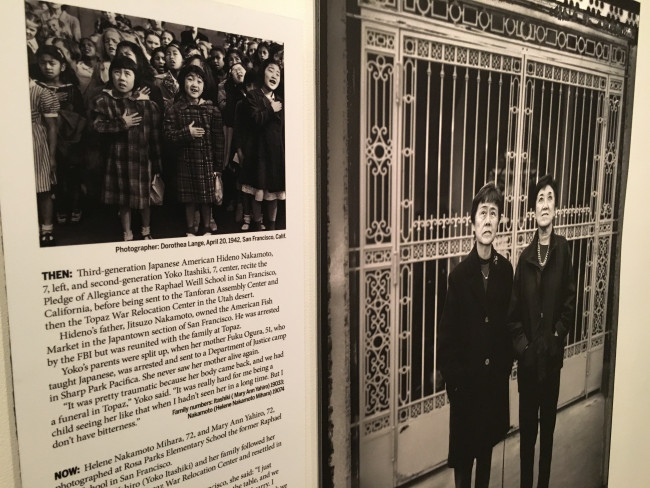
Pledge of Allegiance: Hideno Nakamoto and Yoko Itashiki at age 7 and at 72 Pledge of Allegiance: Hideno Nakamoto and Yoko Itashiki at age 7 and at 72
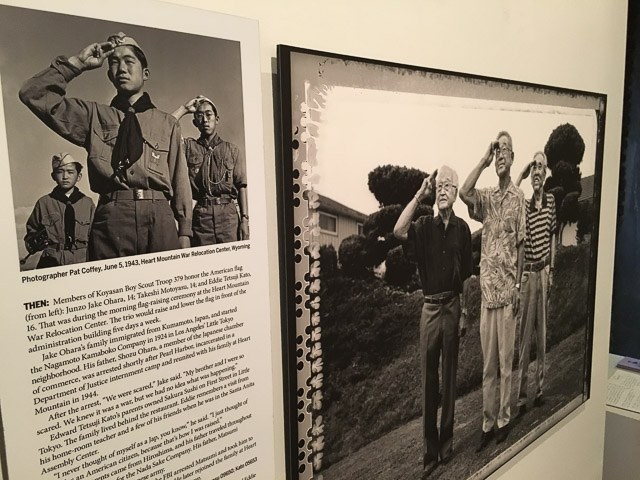
There is a powerful new exhibit at the Oregon Nikkei Legacy Center Museum in Old Town Portland Ore. (121 NW 2nd Ave Portland, OR 97209)

“Gambatte! Legacy of an Enduring Spirit” Open through January 17, 2016.

In this all new traveling exhibit, historic images shot in 1942 by War Relocation Authority staff photographers Dorothea Lange, Tom Parker, and others are juxtaposed with contemporary images of the same individuals taken by Sacramento Bee photojournalist Paul Kitagaki, Jr.

The Story Behind the Exhibit by Paul Kitagaki Jr. on Vimeo.

Kitagaki writes:
In the late 1970s, as I started on my path as a photographer, my uncle, Nobuo Kitagaki, an artist in San Francisco, told me that Dorothea Lange had photographed my grandparents, father and aunt in 1942 as they awaited a bus in Oakland, Calif., to begin their journey into detention. Several years later, while looking through hundreds of Lange’s photographs at the National Archives in Washington D.C., I found her original images of my family.

As I examined Lange’s work I realized that every photograph represented an untold story that was quietly buried in the past. I had many questions and few answers. Most importantly, I wanted to know how Executive Order 9066 forever changed the lives of these internees who unjustly lost their homes, businesses and, sometimes, their families.

In 2005 I began searching for the identities of Japanese immigrants and Japanese Americans whose images of forced relocation were captured by Lange and the other War Relocation Authority photographers, including Clem Albers, Tom Parker and Francis Stewart. It’s a complicated and difficult task, as most of the photographs did not identify incarcerated subjects. During the past eight years I’ve photographed 25 of the original subjects, or their direct descendants, living in California, Oregon and Washington. Recently I’ve located 10 more subjects who need to be photographed. As each year passes we are losing the last Nisei generation along with their untold stories. More

Incarcerated at Heart Mountain: Three Boy Scouts Honor the American Flag (1943 and today) Incarcerated at Heart Mountain: Three Boy Scouts Honor the American Flag (1943 and today)

A Q&A with Paul Kitagaki, Jr. “Photography, Family History, and the Search for Missing Incarcerees” from Densho Blog

Kitagaki’s “Help Find Missing Internees” photo gallery.